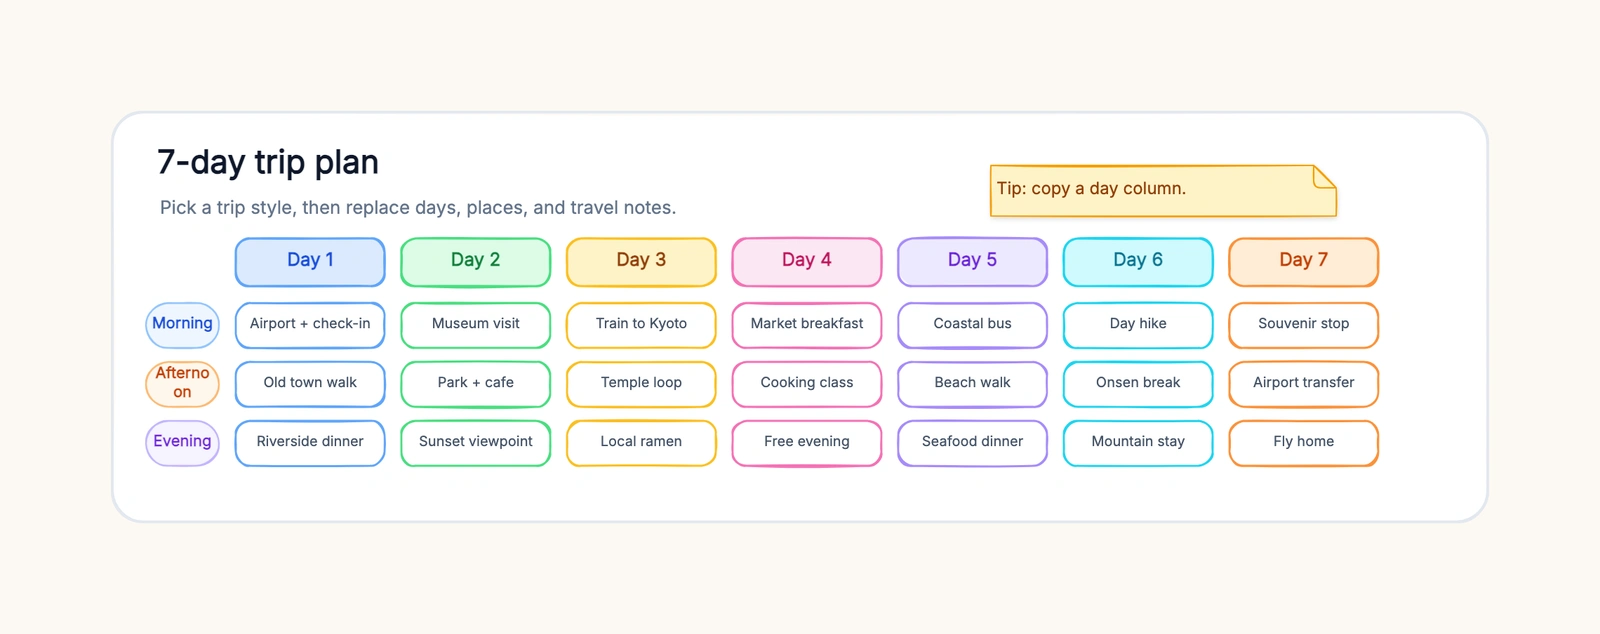
Most trip planning starts in a spreadsheet or a notes app. You collect flight times, hotel addresses, restaurant names, and museum hours into one long list, and the list grows until it stops being useful. Look at it a week later and you can't tell whether Thursday is packed or empty, whether you're zig-zagging across town between two sights, or whether you've left any time to eat.
A visual itinerary fixes all of that at once. Instead of a list, you build a map of the trip: one lane per day, a card for each activity, and arrows connecting places so the flow of the trip is visible at a glance. This guide shows you how to plan a travel itinerary that way — what to put on the canvas, how to structure it day by day, and how to avoid the mistakes that turn trips into a race from one reservation to the next. You can do it on paper, but a free hand-drawn whiteboard like CodePic works better because you can drag things around until the trip actually fits together.
Why Visual Planning Beats a Text List
A text itinerary is a record of a plan. A visual itinerary is the plan itself. That difference changes what you can see and fix before you go.
You see the day-by-day flow. In a list, each day is an isolated block of text. On a board, days sit side by side, so a 9 a.m. tour followed by a 10:30 a.m. flight on Day 3 is obviously wrong the moment you look at it. Uneven days jump out too — Day 2 crammed with seven activities next to Day 5 with one free entry. Balance stops being something you have to calculate and becomes something you see.
You spot gaps. A list hides missing pieces: a city where you have nothing planned, a day with no dinner, a transfer you forgot to schedule between the airport and the hotel. On a canvas, empty space is visible. When a day lane has only one card in it, you know instantly that you've either found your buffer or you've forgotten something.
Travel time becomes a real object. Text lists tend to ignore transit. You write "Museum, 10:00" and never notice the museum is 45 minutes from your hotel. On a visual itinerary, arrows between location cards force you to reckon with distance — if two arrows cross or a route doubles back on itself, you see it and fix the order before you're standing on a train platform doing the mental math.
You can reason about the shape of the trip. The goal of planning isn't to write a document; it's to make decisions. A visual plan lets you move a card from one day to another and immediately see what breaks. Try doing that with a paragraph of bullet points.
How to Structure an Itinerary on a Canvas
Here's the framework that makes a visual itinerary readable. It has four parts, and you should build them in this order.
1. Build the timeline by day. Lay out a column or a horizontal lane for each day of the trip, labeled with the date and the city you're in that night. Day 1 through Day 7, in order, left to right (or top to bottom). This is the spine of the itinerary — every activity will eventually live in one of these lanes.
2. Make each location a node. Instead of writing "Louvre, 9:00-12:00" as a text line, place a location card on the canvas. Give it the place name, the neighborhood or district, and roughly what you want to do there. The point of a node is that it can be connected — it has a position in space, so you can see which locations sit near each other.
3. Make each activity a card. Inside a day lane, add a card per activity with a time and a rough duration. A card is smaller than a location node and moves independently. If you want to swap the morning and afternoon, you drag the two cards, and the whole day reshapes in seconds.
4. Connect places with arrows. This is the step most people skip, and it's the one that prevents real problems. Draw an arrow from each location to the next place you'll go that day. Under the arrow, write the travel time: "Metro, 25 min," "Train, 1 h 20 m," "Walk, 10 min." Now the hidden cost of every move is on the board.
A few practical rules that make the board easy to read:
- One day = one lane. Never let two days share a column. When you need to compare the pace of Thursday and Saturday, the visual balance (or imbalance) is the whole point.
- Group by neighborhood. If you're going to the west side in the morning and the east side in the afternoon, the arrows will cross. Reorder the day so you don't commute across the city twice.
- Color-code by type. One color for sightseeing, another for food, another for transit and moving days. At a glance you can tell if a day is all walking tours and no meals.
- Add an "if time allows" pile. Keep optional activities in a side area near the day they fit. They give you flexibility on the ground without cluttering the plan.
Three Real-World Examples
The framework stays the same, but each trip shape needs a slightly different emphasis.
Weekend trip (2–3 days, one base city)
This is the simplest case and a good first practice. Your timeline is two or three day lanes, and since you sleep in the same place every night, the base city is one node everything else orbits around. Cluster activities by neighborhood so each day covers one or two areas without doubling back.
Concrete example: a weekend in Lisbon. Day 1 lands at noon — put arrival and check-in in the morning lane, then one neighborhood (Alfama) in the afternoon with three loose cards: castle, viewpoints, dinner. Day 2, pick two neighborhoods that are walking distance apart (Baixa in the morning, Bairro Alto in the afternoon) and connect them with a 15-minute walk arrow. Day 3 is a half-day: one card, plus the airport transfer arrow. That's a plan you can actually follow.
7-day multi-city itinerary
Here the arrows between cities matter more than the cards. The route is the plan — you're deciding the order of cities, and that decision has a cascade effect on everything else.
Concrete example: a week in Japan doing Tokyo, Hakone, and Kyoto. Start by drawing the three city nodes and the connections: Tokyo → Hakone (2 hours), Hakone → Kyoto (2.5 hours). Now assign days to each city around those travel blocks. Notice that Hakone between Tokyo and Kyoto means you only move cities twice instead of four times. On the board this route looks like a clean line; a naive plan that flies into Tokyo and out of Osaka then tries to see both in random order looks like a tangle. The arrows tell you which structure is sensible before you buy a single ticket.
Road trip
A road trip is the most arrow-heavy itinerary, because the drive is the itinerary. Structure it as a line of stops, with each arrow carrying a drive time and a rough mileage. A good rule: never plan more than three to four hours of driving on a day you want to actually see something.
Concrete example: a Pacific Northwest loop. Seattle → Olympic National Park (2.5 h drive) → Portland (3 h) → back to Seattle. Put a big card on the long drive days saying "4.5 h total driving, leave by 9 a.m." so you've made the tradeoff explicit. When you can see the whole loop on one canvas — the distances, the stops, the overnight towns — it's obvious where the trip needs a shorter drive or an extra night.
Common Mistakes
Over-scheduling every day. The most common itinerary mistake is planning a day as if nothing will go wrong. Real days include slow breakfasts, long lunches, queues, wrong turns, and tired feet. If a day lane has six cards and two travel arrows, cut one or two cards and mark them optional. A trip with slack is a trip you enjoy.
No buffer between activities. Even a modest plan breaks if you schedule the 10 a.m. museum and the 1 p.m. tour back to back with no gap for lunch or transit. After you add travel-time arrows, add a visible 30–60 minute buffer between major activities. Treat the buffer as part of the plan, not wasted time.
Bad logistics order. This is the one that sneaks up on people. You plan a full day in the city center, then realize the only free time to visit the castle on the hill is the same morning you're supposed to drive north — so you'd be driving 40 minutes out of your way. On a canvas, draw the locations before finalizing the order, and put the arrow-test on every day: does any leg double back or cross town? Reorder until the route is sensible.
Planning around bookings instead of bookings around the plan. If you book flights, hotels, and tours before mapping the itinerary, you'll shape the trip around what you already paid for. Book the big skeleton (flights and the first night) to lock dates, then plan everything else on the board, then commit to the remaining reservations.
Forgetting that the plan will change. Treat the itinerary as a living map, not a contract. The weather changes, a place you love keeps you for three hours, someone's feet hurt. A good itinerary has gaps and optional activities built in so that when reality interrupts, the plan bends instead of shattering.
Frequently Asked Questions
How far in advance should I plan a trip?
Start the rough structure three to eight weeks out for most trips, and further ahead for peak season or international travel. Build the visual skeleton early — cities, days, route — then fill in the details closer to the date. You don't need reservations to start planning; you need a map.
How detailed should each day of an itinerary be?
Plan two or three anchor activities per day and leave the rest open. A day stacked with more than that has no buffer for travel time, meals, or delays. Leave gaps, mark optional activities as "if time allows," and the plan survives contact with reality.
Should I book everything before planning my itinerary?
No. Map the itinerary first — cities, days, routes, must-do activities — then book around the plan. If you book everything first, you plan around what you already paid for instead of what makes sense on a map, and changing direction gets expensive.
Plan Before You Start
The fastest way to plan a trip is to draw it before you book anything. Use this travel itinerary template to map out your trip — drop a lane per day, place your locations, connect them with travel-time arrows, and see the whole trip at once on an infinite canvas. When you can see the shape of the journey, the gaps and the over-scheduled days fix themselves, and you only book the things that actually fit.
Related Reading
- What Is an Infinite Whiteboard? — the canvas behind this whole approach
- How to Make a Mind Map — another way to organize trip ideas before committing
- Simple Project Timeline Template — the same day-by-day thinking for any plan
- Free Timeline Maker — when you want a straight-line view of the trip