Two teachers can cover the same topic with the same class and get very different results — the difference is often the plan. A good lesson plan starts from what students should be able to do, budgets time so there's room to practice, and builds in a way to check whether it worked. A weak one is a list of activities with no objective and no way to tell if anyone learned anything.
In this guide we'll write a lesson plan together, start to finish, using a real Grade 6 science lesson (the water cycle). Then we'll look at the main lesson-plan formats so you can pick the right one, and finish with a blank framework you can copy for any subject.
Work Backward: Objective → Assessment → Activities
The single most common planning mistake is starting with a fun activity and reverse-engineering a goal. That produces busy lessons where nobody's sure what was learned. Do the opposite — what teachers call backward design:
- Decide what students should be able to do (the objective).
- Decide how you'll know they can do it (the assessment).
- Only then choose the activities that get them there.
Everything below follows that order.
Step 1 — Write one measurable objective
Write it as a "students will be able to…" (SWBAT) statement, using a verb you can actually observe:
- ✅ "Students will be able to describe and label the four stages of the water cycle."
- ❌ "Students will understand the water cycle." (You can't see "understand.")
Keep it to one or two objectives per lesson. If you list five, you can't teach or assess them all in one period. The test: if you can't write the quiz question straight from the objective, it's too vague — swap in an observable verb like label, explain, compare, or solve.
Step 2 — Design the assessment before the activities
This is the step most plans skip, and it's what makes backward design work. Before choosing a single activity, decide how you'll check the objective and what "good enough" looks like:
Exit ticket: Name the four stages of the water cycle in order and label a blank diagram. Success = 3 of 4 correct.
Now every activity in the lesson has a clear target: get students able to pass that exit ticket. If an activity doesn't move them toward it, it's decoration — cut it.
Step 3 — Plan the sequence with gradual release
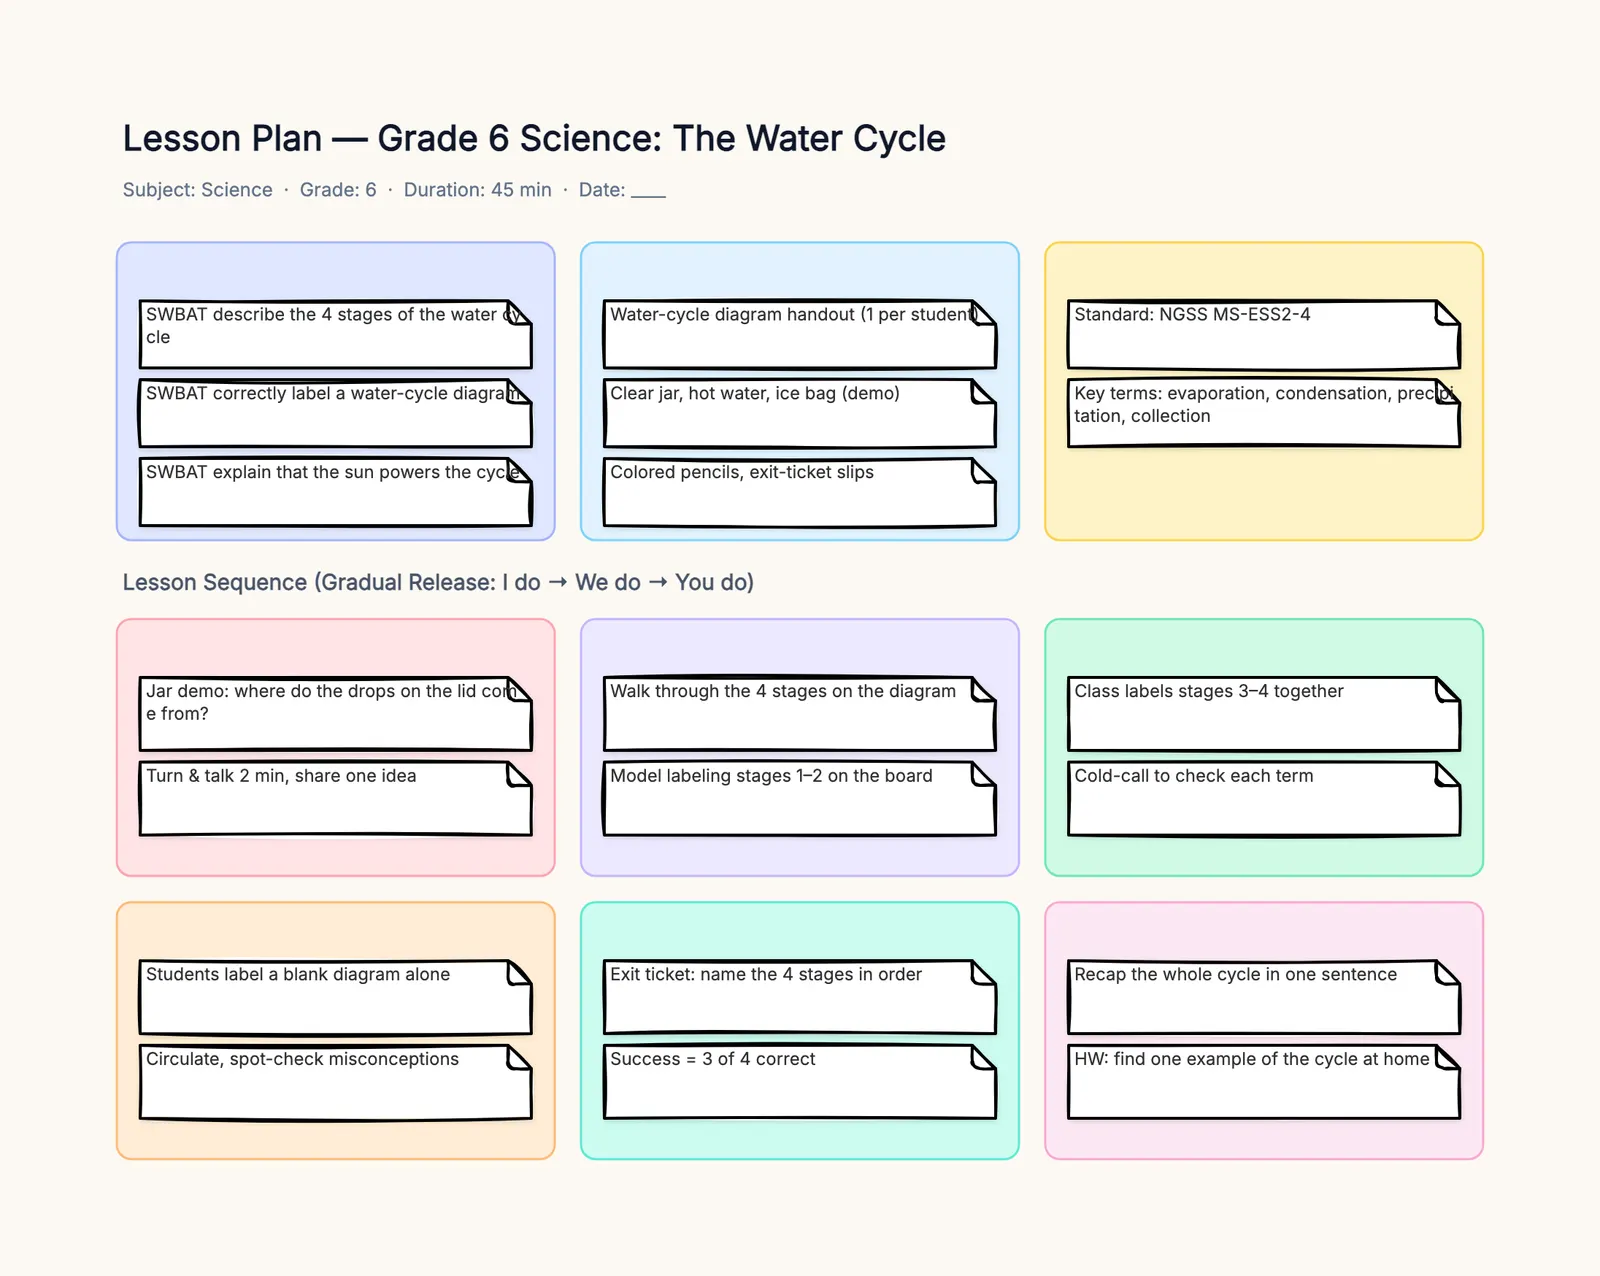
The heart of the plan is the sequence of activities, with a time budget on each one. A reliable structure for teaching a skill is gradual release — responsibility moves from you to the student in three steps, with a warm-up and closure on either end. Here's the actual water-cycle lesson:
- Warm-up (5 min): Show a jar of hot water with a bag of ice on the lid. Ask, "Where do the drops on the underside of the lid come from?" Turn & talk for two minutes.
- I do (12 min): On a labeled diagram, walk through the four stages. Model labeling stages 1–2 on the board, thinking aloud so students hear the reasoning.
- We do (12 min): As a class, label stages 3–4 together. Cold-call students to check each term.
- You do (10 min): Students label a blank diagram on their own while you circulate and spot-check misconceptions.
- Closure (2 min): One student recaps the whole cycle in a sentence. Homework: find one example of the water cycle at home.
Those minutes add up to about 41, leaving room for transitions in a 45-minute period. The rule that matters most: protect the "you do" time. The most common failure is "I do" running long until independent practice — the part where students actually learn — gets cut to nothing.
Step 4 — List materials and vocabulary last
Now that the activities are set, you know exactly what you need, so nothing goes missing at minute three:
- Materials: water-cycle diagram handout (one per student), clear jar, hot water, ice bag, colored pencils, exit-ticket slips.
- Key vocabulary: evaporation, condensation, precipitation, collection.
- Standard: note the curriculum standard the lesson addresses (here, a middle-school earth-science standard).
That's a complete, teachable plan — objective, assessment, sequence, and materials — built in about ten minutes because the order did the thinking for us.
Pick the Right Lesson-Plan Format
Gradual release fits the water-cycle lesson because it teaches a concrete, labelable skill. But it isn't the only format, and the wrong one makes a lesson feel forced. Choose by the type of lesson, not by habit:
| Format | Structure | Best for |
|---|---|---|
| Gradual release | I do → we do → you do | Skills and procedures — solving an equation, a lab step, a reading strategy |
| 5E | Engage, Explore, Explain, Elaborate, Evaluate | Inquiry and science — students explore a phenomenon before you explain it |
| Madeline Hunter | 7 steps (objective, input, modeling, checking, practice…) | Formal observations that expect a highly structured plan |
| Simple / 5-part | Objective, warm-up, teach, practice, close | A quick daily plan when you don't need the full scaffold |
| Weekly / unit | Each day or lesson is one column | Zooming out — spread one objective across a week |
The one thing every format shares is the backbone from the last section: a measurable objective, activities with time, and a check for understanding. Pick the format that fits, but never drop those three.
A Blank Lesson Plan You Can Copy
Here's the fill-in framework. Copy it and answer each prompt — the prompts are written so that if you can complete them honestly, the plan is sound:
- Header: Subject ___ · Grade ___ · Duration ___ · Date ___
- Objective: "Students will be able to ___" (one observable verb)
- Assessment: "I'll know they got it when ___" (success = ___)
- Warm-up (___ min): a hook or retrieval question that ___
- I do (___ min): I'll model ___
- We do (___ min): together we'll ___
- You do (___ min): students will independently ___
- Closure (___ min): recap ___ ; homework ___
- Materials & vocabulary: ___
If a box won't fill in — most often the assessment or the "you do" — that's exactly where the lesson is weak, and you've found it before class instead of during it.
Three Watch-Outs
Even with the framework, three problems sneak in most often:
- "I do" eats the clock. Budget the minutes up front and guard independent-practice time first.
- The objective and assessment don't match. They should mirror each other — if the exit ticket tests something the objective didn't promise, fix one of them.
- You skip the warm-up or closure. They're short but do a disproportionate amount of the learning; keep them even when time is tight.
Put It on One Board
You don't need a Word table to plan a lesson — you need one view where the objective, the sequence, and the assessment are all visible at once, so you can see whether they line up. Sketch the sections, drop in sticky notes, and share the board with your mentor or grade team for feedback before you teach.
The template below lays out every part of a lesson — objectives, materials, standards, the gradual-release sequence with time budgets, assessment, and closure — and ships filled in with the Grade 6 water-cycle lesson from this guide, so you can see the grain size and edit from there. Rewrite the notes for your subject, grade, and lesson length, and reuse the board as a weekly or unit planner.
To plan a whole unit before you split it into lessons, pair this with a mind map or a concept map.