A classroom seating chart is not just a list of names in boxes. It is a small classroom-management system. It affects who can see the board, who can hear instructions, who gets peer support, who distracts whom, and whether a substitute teacher can understand the room in two minutes.
The mistake is treating seating as a one-time administrative task. Good seating charts change with the lesson. Rows may be right for a test week. Groups of four may be right for a lab. A U-shape may be right for discussion, debate, or student presentations.
This guide walks through how to make a classroom seating chart you can actually use, not just print once and forget.
Start with the teaching mode
Before you place any student, decide what the room needs to support.
For direct instruction, students need a clear sight line to the board and teacher. Rows or gentle arcs usually work. For group work, students need to face peers and share materials. Groups of four are often easier than pairs because roles can be split. For discussion, students need to see one another; a U-shape or seminar layout works better than a grid.
Write the teaching mode at the top of the plan. It sounds simple, but it keeps you from solving the wrong problem. A layout that is perfect for collaboration may be terrible for a quiet assessment day.
Mark fixed classroom points
Next, mark the things that do not move easily:
- board or screen;
- teacher desk or teaching station;
- door;
- windows;
- projector or camera line;
- reading corner;
- sink, lab bench, or supply shelf;
- accessibility routes.
These points shape the seating plan. A student who needs a clear view should not sit behind a column or at a sharp angle to the board. A student who needs frequent teacher support may need to sit near a circulation path, not buried in the back corner.
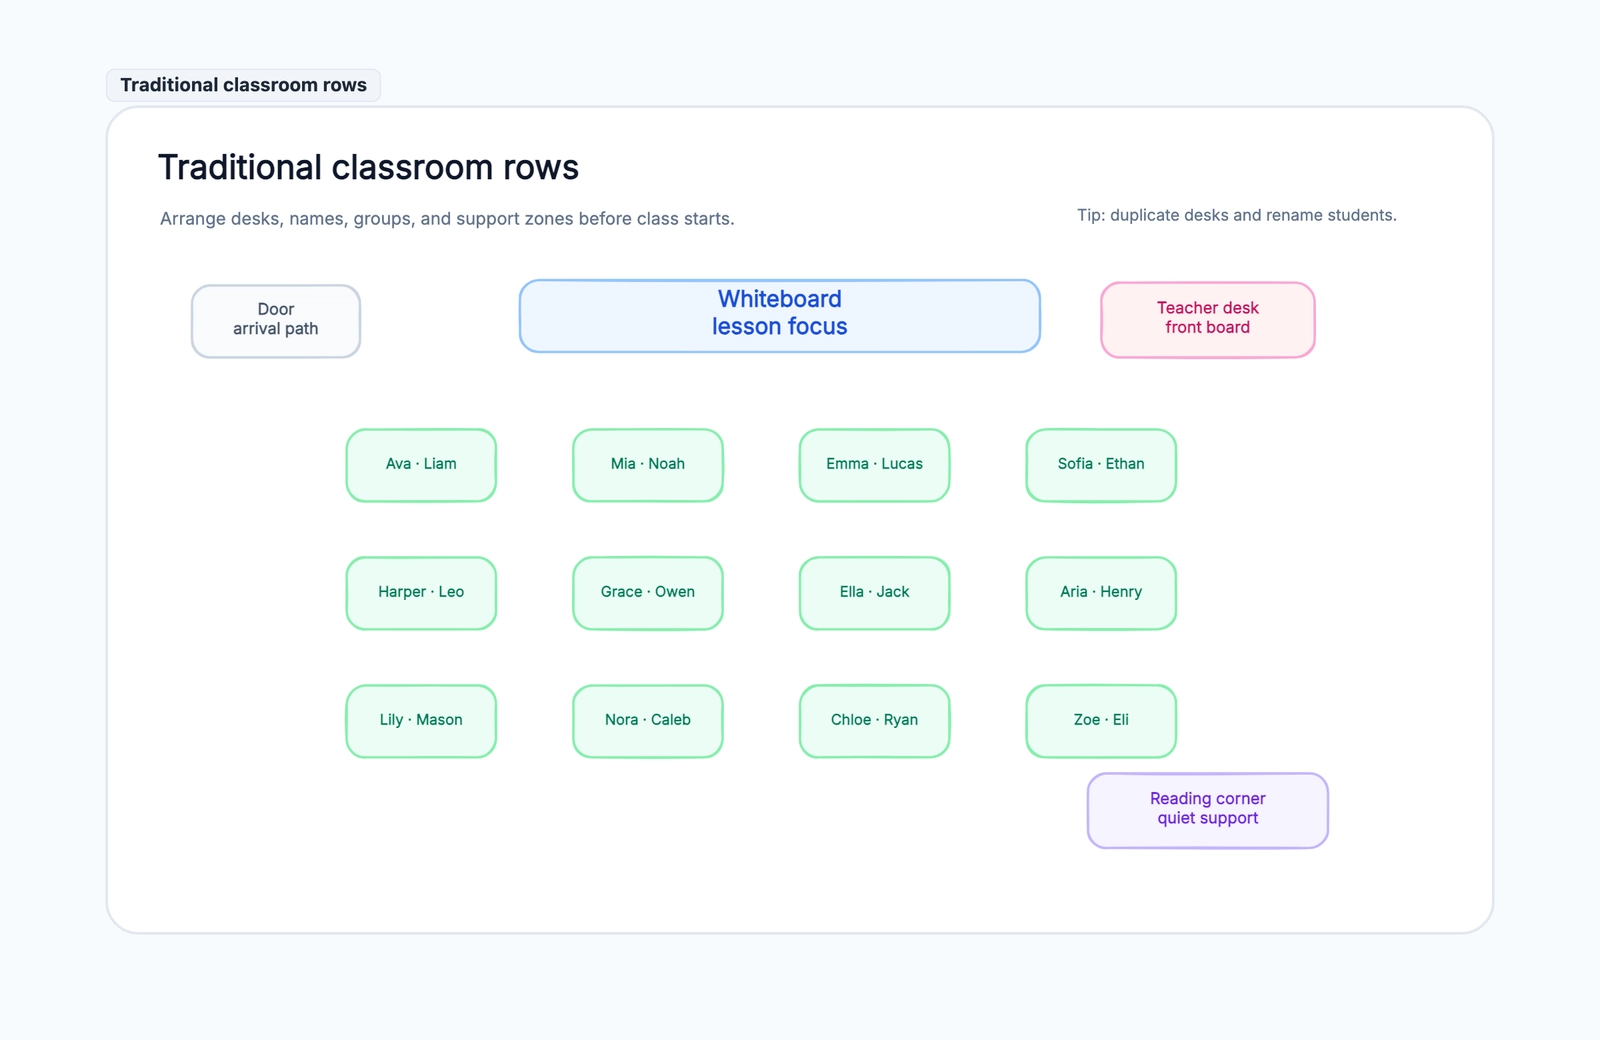
The classroom seating chart template starts every scene with the board, teacher area, door, and support zone visible for that reason.
Place support needs before friend groups
Friend groups matter, but they should not be the first filter. Start with learning and access needs:
- vision or hearing needs;
- language support;
- attention or movement needs;
- students who benefit from proximity to the teacher;
- students who need a peer model;
- students who should not sit next to each other;
- students who can support group work without carrying it alone.
This does not mean seating should feel punitive. It means you are designing the room for learning first. If two friends work beautifully together, keep them together. If they turn every activity into side conversation, separate them without making it a public drama.
Choose a layout pattern
Traditional rows are useful when the front of the room matters. They reduce side-facing conversation and make it easy for a substitute to scan the room. Leave aisles so you can circulate, not just walk down the center.
Groups of four are useful when students need to talk, build, read together, or solve problems. The key is to make each group balanced. Put one strong organizer with students who need structure, but avoid making one student responsible for everyone else.
U-shape seating works when discussion matters. Students can see faces, the center stays open, and the teacher can move inside the shape. It is less efficient for large classes but powerful for seminars, debate, language practice, and presentations.
There is no permanent winner. Save multiple scenes so you can switch layouts by unit or activity.
Make names readable
This sounds obvious until a substitute opens the chart and cannot read half the names. Use enough space. Avoid tiny text. If you include notes, keep them brief and professional. A seating chart may be seen by co-teachers, support staff, substitutes, administrators, and sometimes families.
A useful chart can include:
- student names;
- group numbers;
- teacher desk and board;
- door and arrival path;
- support or reading corner;
- short operational notes such as “near teacher support” or “peer coaching group.”
Avoid sensitive information on a chart that might be printed or shared casually. Use neutral wording. “Near teacher support” is better than a label that exposes a student’s private need.
Test the room from the teacher path
A seating chart is also a movement chart. Ask:
- Can I reach every student quickly?
- Can I see screens or notebooks when needed?
- Can students get materials without crossing the whole room?
- Does the door path cut through the most active group?
- Is there an accessible route?
- Can a substitute understand the seating pattern quickly?
Walk the path on the diagram before you walk it in the classroom. If you cannot move through the plan on paper, the real room will feel worse.
Common mistakes
The first common mistake is over-optimizing for behavior and under-optimizing for learning. Separating talkative students may help, but the chart also needs to support visibility, peer help, language development, and teacher circulation.
The second mistake is changing seats without changing the task. If you move into groups, give students a reason to work as a group. Otherwise the layout invites conversation but the lesson still rewards individual silence.
Another mistake is making the chart only understandable to you. A substitute needs a version that is clean, readable, and not full of private shorthand.
Finally, do not freeze the first seating chart. The first week tells you things the roster cannot. Keep the editable version and adjust after you see how the class actually behaves.
Free classroom seating chart template
Open the classroom seating chart template and choose the scene closest to your lesson:
- rows for direct instruction or assessments;
- groups of four for collaboration;
- U-shape for discussion and presentations.
Replace the sample names with your students, duplicate or delete desks, and keep a copy for later adjustments. If you are also planning the activity sequence, pair the seating chart with the lesson plan template.
The goal is not a perfect chart. The goal is a room where students can see, hear, collaborate, and get help without the seating fighting the lesson.