A stage plot example shows you what an actual usable stage plot looks like — not just a diagram, but the kind of document a venue sound engineer can look at and immediately understand where to place mics, monitors, and DI boxes. If you have ever shown up to a gig and the engineer asked "do you have a stage plot?" while looking at your hand-drawn napkin sketch with pity, you know why a clear stage plot matters.
This article walks through a complete stage plot example for a 4-piece band: vocalist, guitarist, bassist, and drummer with keys. It covers what to include, common mistakes that make stage plots useless, and how to create one that actually helps the sound check go faster. Open the free stage plot template to follow along.
A Complete Stage Plot Example: 4-Piece Band
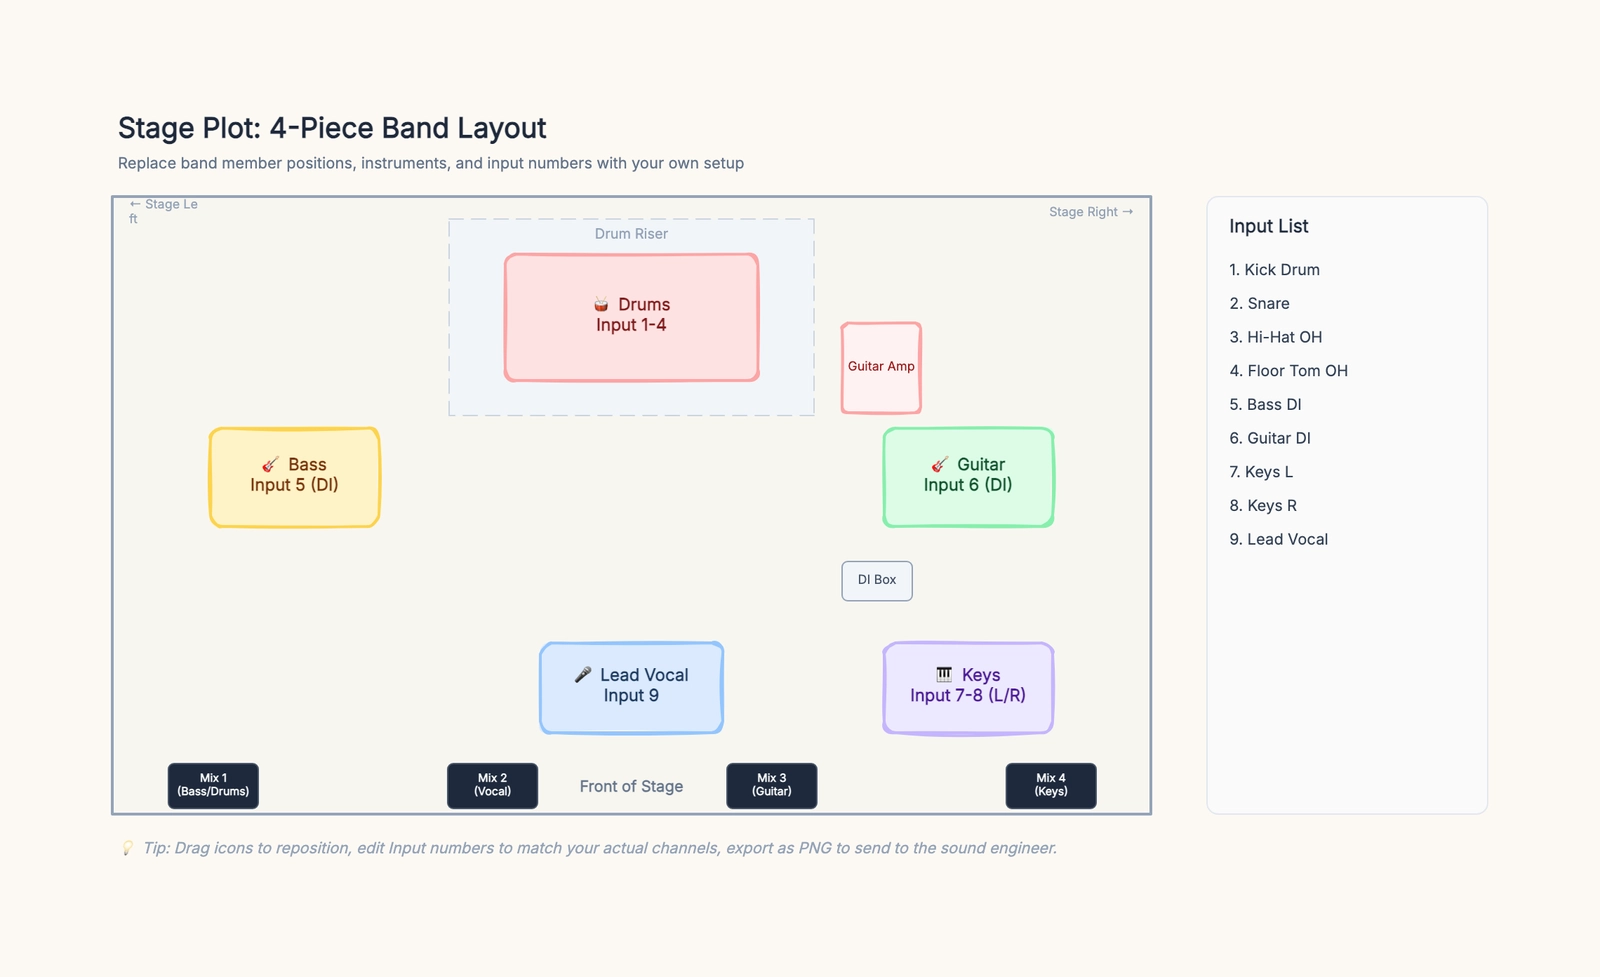
Here is a band stage plot example for a standard rock/pop four-piece with keys. This is the same setup pre-filled in the template.
Stage Layout
Stage orientation: the diagram uses standard stage perspective — stage left and right are from the performer's view looking at the audience. "Stage left" means the left side of the stage as the band sees it, not as the audience sees it.
Drum riser: centered at the back of the stage. The drum kit occupies 4 input channels and comes first in the input list: kick drum (Input 1), snare (Input 2), hi-hat overhead (Input 3), and floor tom overhead (Input 4). Drums are always listed first because they occupy the most channels and are physically closest to the stage snake in most setups.
Bass: stage left, mid-position. Bass DI to Input 5. No amp on stage — bass goes direct to the PA and the bassist hears themselves through the monitor wedge.
Guitar: stage right, mid-position. The guitarist uses a DI box (Input 6) running to the PA, with a guitar amp behind them for stage volume. The sound engineer takes the DI signal for the PA mix and lets the amp provide on-stage monitoring.
Keys: stage right, front corner. Stereo keyboard output to Inputs 7 (L) and 8 (R). The keyboard player needs two channels to preserve the stereo image of patches and piano sounds.
Lead vocal: front center. The vocal mic is on a straight stand at center stage, about 2 feet from the front edge. Input 9. Vocals are listed last because the engineer typically sets gain and EQ on vocal channels after the instruments are dialed in.
Monitor Positions
Four monitor wedges along the front edge of the stage:
- Monitor 1 (stage left): bassist and drummer side-fill
- Monitor 2 (center-left): vocalist's primary monitor
- Monitor 3 (center-right): guitarist's monitor
- Monitor 4 (stage right): keyboard player's monitor
Each monitor wedge should be labeled with a mix number or the performer's name so the monitor engineer knows which mix feeds which wedge. If you need individual monitor mixes (common with in-ear monitors), note that on the plot.
Input List
The input list maps physical sound sources to mixer channels. Number them in a logical order — drums first (they use the most channels and sit closest to the stage snake), then bass, guitars, keys, and vocals last.
- Kick Drum
- Snare
- Hi-Hat OH
- Floor Tom OH
- Bass DI
- Guitar DI
- Keys L
- Keys R
- Lead Vocal
Common Stage Plot Mistakes
Wrong stage orientation. The most common mistake is drawing the stage from the audience's perspective. Stage plots must be from the performer's perspective. Write "Stage Left" and "Stage Right" clearly on the diagram, and put the front of stage at the bottom.
Missing the input list. A stage plot without an input list is half a document. The sound engineer needs to know which physical input on the snake or stage box corresponds to which channel on the console. Put the input list on the same page as the stage plot.
Vague monitor labels. "Monitor 1" is not enough. Write "Vocal Monitor (Mix 1)" or "Drummer Side-fill." The monitor engineer has multiple mixes to manage and needs to know which performer gets which mix.
Not updating the plot. Your stage plot from last year's tour is wrong if you changed guitarists, switched to in-ears, or added a keyboard player. Update the plot before every tour or major show. An outdated plot is worse than no plot — the engineer will set up for a configuration that does not exist.
How to Create a Stage Plot That Engineers Actually Use
- Keep it readable. Use clear labels, distinct colors per performer, and large enough text. The engineer will look at this on a phone or tablet in a dimly lit venue.
- Include power and special needs. If the keyboard player needs a power drop, mark it. If the vocalist uses a specific mic (e.g., "Beta 58A only"), note it.
- List preferences, not demands. "We prefer 4 monitor mixes if available, but can work with 2" is more useful than "4 MONITOR MIXES REQUIRED!!!" Engineers want to help — give them options.
- Send it in advance. Email the stage plot to the venue at least 48 hours before the show. Do not wait until load-in. The advance copy lets the engineer pre-label the snake and position mics before you arrive.
Stage Plot Considerations for Different Types of Shows
Small club or bar gig: keep it simple. A 4-piece band in a small venue may only need 8–12 inputs, and the sound engineer is probably working on a compact digital mixer with limited channels. Focus on the essentials: vocal mics, instrument DIs, and one or two monitor mixes. Skip the detailed input list and just number the channels clearly.
Festival or multi-band show: speed of changeover matters more than detail. Include a note about your setup time and any special requirements that slow down the switch. Label everything clearly because the festival engineer will not remember your band's preferences from the advance email. Use large, bold text that can be read from a phone screen in direct sunlight.
Corporate or wedding band: these gigs often involve unusual stage layouts — stages in corners, L-shaped rooms, or outdoor tents. Include a simple diagram of the stage shape if it is non-standard. Note any power requirements (keyboards, pedalboards, laptops) because corporate venues often have limited stage power.
Tour with consistent lineup: create one master stage plot and update it only when something changes. Include your band's contact info and preferred backline (amps, drums, keyboards) on the plot. A touring band with a clean, professional stage plot builds trust with venue engineers before they even arrive.
In-ear monitor setups: if your band uses in-ears instead of wedges, the stage plot changes significantly. Remove the monitor wedges from the diagram and add a note about how many monitor mixes you need and whether you bring your own IEM rack or need the venue to provide sends. Many venues still default to wedges, so make the in-ear setup visually obvious.
How to Read and Use Your Stage Plot at the Venue
When you arrive at the venue, hand a printed copy or show the PNG on your phone to the sound engineer. Walk them through it in 30 seconds: "Five-piece band, drums on a riser upstage center, vocal front center, guitar stage right with a DI and an amp, bass stage left DI only, keys stage right with stereo DI. Nine inputs total — input list is on the right side of the plot. Four monitor mixes."
The engineer will use the plot to label the stage snake or digital stage box, position mic stands, and route monitor mixes before you play a note. A clear stage plot can cut 15–20 minutes off your sound check. That is 15 minutes you can use to play.
Digital vs. Printed Stage Plots: What to Bring
Always have both. Send a digital PNG or PDF to the venue 48 hours in advance — this is what the engineer uses to prep. But also bring two printed copies to the show. Venues have Wi-Fi problems, phones die, and engineers with gloves on do not want to swipe through a PDF on a dirty screen. Tape one printed copy to the stage snake or monitor console so it is visible during setup. Give the other copy to the monitor engineer if there is a separate monitor position. A printed stage plot on a music stand next to the snake is worth more than the most beautifully designed digital file that nobody can access because the venue's router is password-protected and nobody knows the password.
What to Send with Your Stage Plot
Do not send the stage plot by itself if the venue has never worked with you before. Add a short advance note with the same information the engineer will need during setup: arrival time, number of performers, whether you bring your own microphones or DI boxes, how many monitor mixes you prefer, and whether any member uses in-ear monitors. Keep the note boring and practical. The goal is not to impress the venue; the goal is to remove surprises before load-in.
If the routing is unusual, include a separate audio signal flow diagram showing how playback rigs, splitters, interfaces, and the venue console connect. Keep physical positions on the stage plot and signal routing in the signal-flow document so neither becomes crowded.
A good email subject is specific: "Stage plot and input list for The River Keys — July 31 show." Attach the PNG stage plot, paste the input list into the email body, and include one contact number for day-of-show questions. If the attachment fails, the engineer still has the channel list in the email. If the lineup changes, send an updated stage plot with "updated" in the filename so nobody prints the old one.
Open the free stage plot template, replace the pre-filled band positions with your own lineup, update the input list, and export as PNG for your next show.