Two warehouses can hold the same racking and the same team and still differ by 30% in cost per order — the difference is the layout. A good warehouse layout moves goods in one direction with the shortest possible travel; a bad one sends forklifts and pickers crossing paths all day. The good news: you can figure out most of it on a single floor-plan diagram before you spend a dollar on racking or sign a lease.
This guide walks through how to design a warehouse layout — the zones, the flow shape, and the mistakes to avoid — and gives you an editable template to start from.
Start with the Docks, Not the Zones
The one thing you can't drag around is the dock doors. They're set by the building, so design everything else around their real positions.
- Docks on two opposite walls → an I-shaped through-flow is possible (receiving one end, shipping the other).
- Docks on one wall only → you're looking at a U-shaped flow that loops back to the front.
- A squarer building or a column line in the way → an L-shaped flow that turns 90° once.
Mark the real dock positions first. Everything downstream depends on them.
The Six Zones Every Warehouse Layout Needs
Lay these out in the order goods move through them:
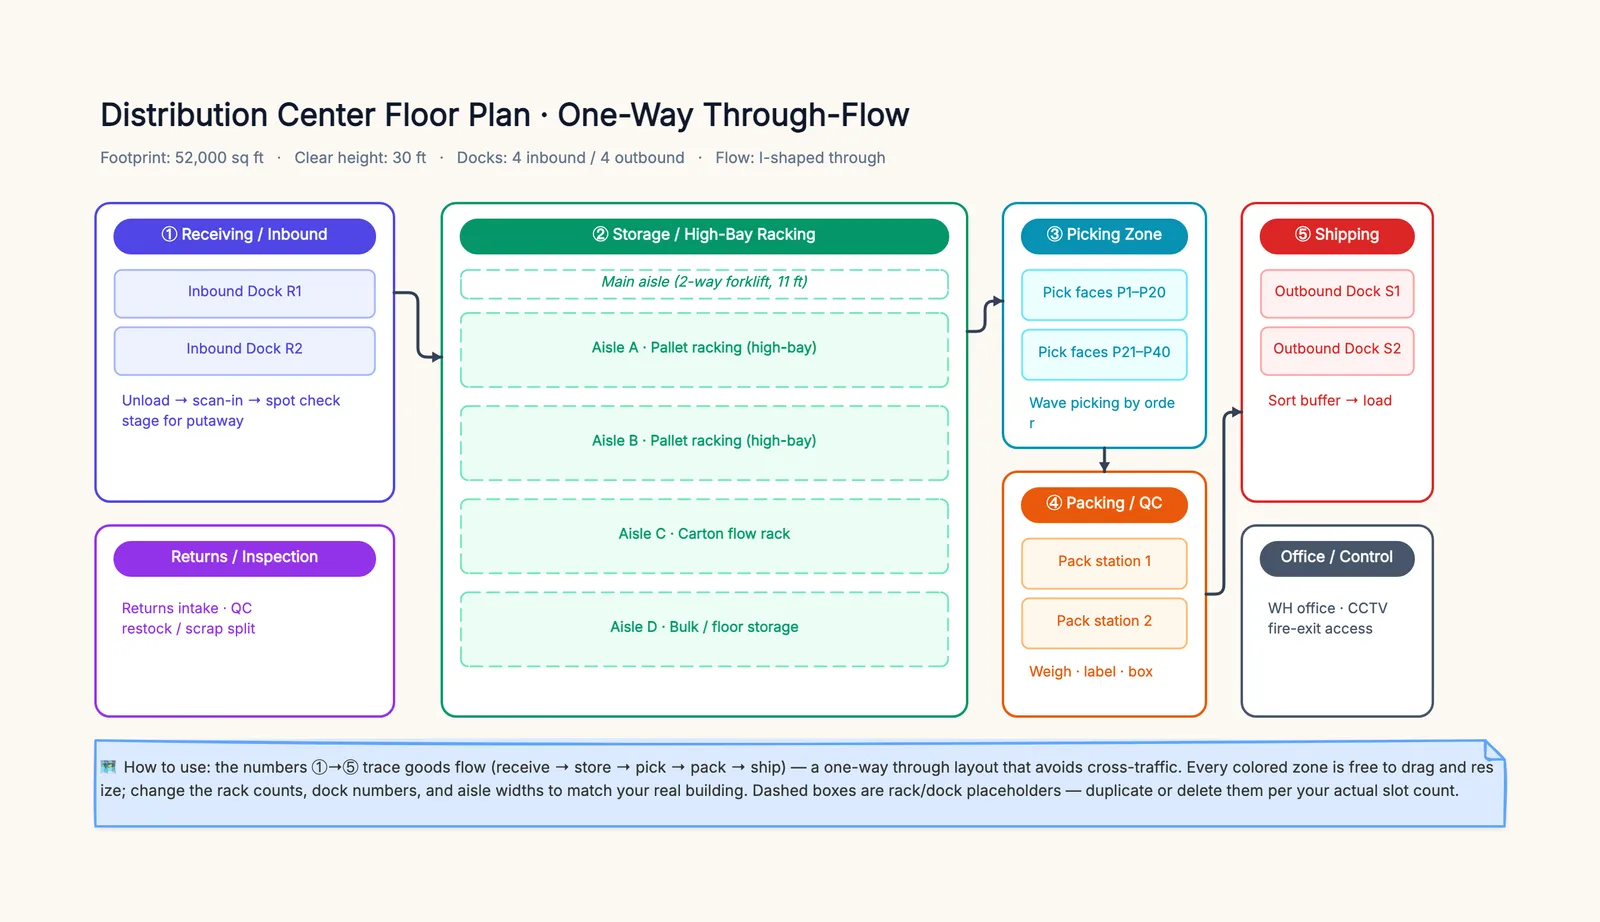
1. Receiving / inbound. Where trucks unload. You scan in shipments, spot-check quality, and stage goods for putaway. Put it next to the inbound docks.
2. Storage. The core of the building — pallet racking for full pallets, carton flow rack for cases, bulk floor space for oversized or fast-moving stock. Decide your aisle direction here.
3. Picking. Where orders get pulled from pick faces. This is 50–70% of your labor, so its placement matters more than any other zone.
4. Packing / QC. Weigh, label, box, and check. Keep it right next to picking.
5. Shipping / outbound. Stage picked-and-packed orders and load them onto trucks. Put it next to the outbound docks.
6. Returns and office. Don't skip returns — for e-commerce it's 20–30% of volume and needs its own home, or it clogs receiving. The office and control room round it out.
Choosing Your Flow Shape
The flow is the path a single item takes from the moment it arrives to the moment it ships. Draw it as arrows and check one thing: no line should cross another.
| Shape | Docks | Best for |
|---|---|---|
| I (through-flow) | Opposite walls | High-throughput 3PL, e-commerce |
| U | One wall | Single-dock buildings, cross-docking |
| L | Two adjacent walls | Squarer buildings, column constraints |
Whichever shape you pick, keep picking → packing → shipping as neighbors. Every extra meter between them is multiplied by thousands of picks a day.
Five Mistakes That Quietly Break a Layout
- Crossing flow paths. If inbound and outbound arrows cross on paper, forklifts cross on the floor. That's your congestion point.
- Picking far from shipping. Picking is most of your labor — a long pick-to-ship path taxes every single order.
- Aisles too narrow for the equipment. A reach truck needs ~9 ft, a counterbalance forklift ~12 ft. Label each aisle with the vehicle that uses it.
- No returns zone. Especially in e-commerce. Returns with no home pile up in receiving.
- Ignoring fixed dock positions. The perfect internal flow is useless if the docks are on the wrong walls.
Draw It on a Floor Plan First
You don't need CAD to think through a layout — you need a fast, editable diagram you can change in a meeting. Sketch the zones as colored blocks, draw the flow arrows, and share the board so your team can mark bottlenecks. Once everyone agrees, then hand the concept to a drafter for a to-scale CAD drawing.
The template below gives you all six zones color-coded, with the receive → store → pick → pack → ship flow already drawn as a one-way I-shape. Drag the zones to match your building, change the rack and dock counts, and re-route the arrows into a U or L if that's your shape.
Warehouse Layout Template
Try this templateFor the process side of the operation — who does what at each step — pair the layout with a process map or a swimlane diagram.