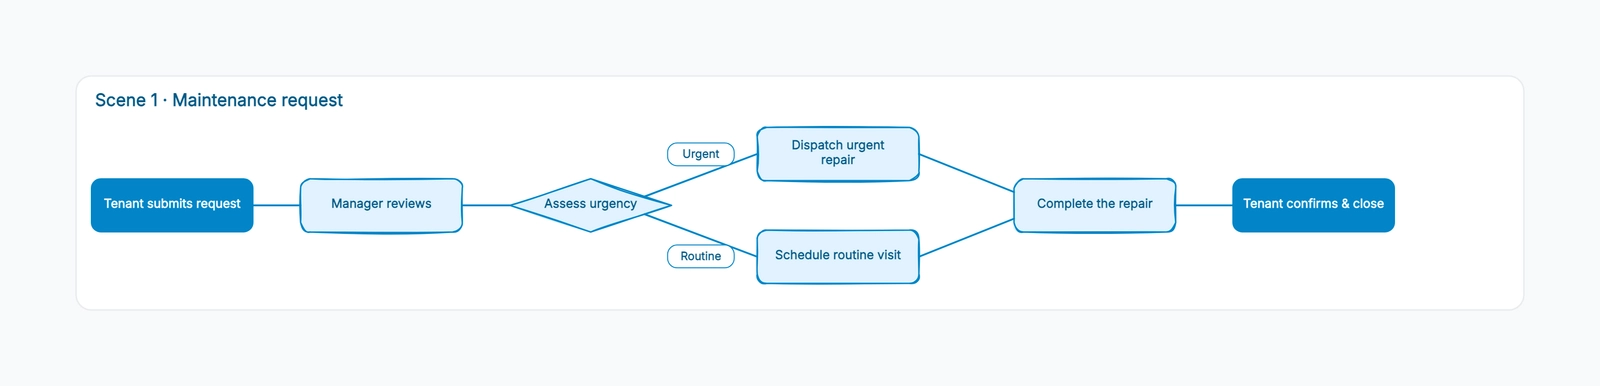
A property management workflow is how a request or a tenant moves through your office without depending on one person's memory. When a repair is requested, when a tenant moves in, when a lease ends — each of these follows a sequence of steps, and if any step is skipped, the cost lands on someone real: a tenant waiting on a leak, a unit sitting vacant, a deposit refunded late.
This guide walks through the three property management workflows every office repeats, and how to create each one as a clear diagram that your whole team can follow.
Why a documented workflow beats a mental checklist
Most property managers carry their process in their head. It works until the office is busy, someone is on leave, or a new hire starts, and then the unspoken steps get dropped.
A documented workflow fixes this by making every step and every handoff explicit. When the tenant submits a maintenance request, the diagram shows what happens next and who owns it. No one has to ask "whose turn is it" because the answer is drawn on the page.
The difference is most visible during turnover. Between tenants, a dozen things have to happen in a specific order — inspection, cleaning, deposit, keys — and a missed step means the next tenant moves into a unit that was not actually ready. A workflow is what keeps a fast turnover from becoming a sloppy one.
The three workflows every property manager needs
Three processes repeat in every property office, and each deserves its own documented flow.
The maintenance request flow moves a tenant's problem from submission to resolution. The lease move-in flow moves a new tenant from a signed lease to keys in hand. The renewal or vacate flow moves a unit from an ending lease to either a signed renewal or a cleaned, re-leasable unit.
They share a shape — a start, a series of handoffs, and a confirmation that closes the loop — but each has different steps and owners, so keep them as three separate diagrams rather than one combined chart.
Who owns each step
A workflow without owners is a sequence that nobody moves. In a property office, the owners fall into a few consistent roles.
The tenant starts most flows by submitting a request or responding to a notice. The property manager reviews and triages, deciding urgency and priority. The maintenance coordinator, or the manager in a smaller office, assigns contractors and schedules visits. The contractor completes the work. And the tenant, or the owner's representative, confirms the result, which closes the loop.
Naming these roles on the diagram matters more than naming specific people, because the roles outlive any individual hire. A new property manager can step into the manager role without anyone having to explain the whole process from scratch.
The maintenance request workflow
A maintenance request is the most time-sensitive of the three, because a tenant is usually waiting on it.
The flow starts when the tenant submits the request. The property manager reviews it and assesses urgency — a leak is not the same as a squeaky hinge. Based on urgency, a contractor is assigned and a visit is scheduled. The repair is completed, and then the critical step: the tenant confirms it is actually fixed. Only then does the ticket close with the resolution recorded.
Triage is worth spelling out as its own step, because it determines everything downstream. A high-priority request — water, heating, security — gets a same-day contractor and a faster path. A low-priority request is scheduled into the next maintenance window. If the flow treats every request the same, urgent repairs get buried under routine ones.
Notice where this flow can break. If the confirmation step is missing, a request gets marked complete the moment the contractor reports done, while the tenant is still waiting. The confirmation is what turns "the contractor said it is fixed" into "it is actually fixed."
The lease move-in workflow
Move-in protects both the tenant and the owner, and the workflow is built around documenting the unit's condition.
The flow starts with the signed lease and a confirmed move-in date. The unit is inspected before handover, so both sides agree on its condition. The deposit and first rent are collected, then the keys are handed over. The move-in condition is recorded in writing, and the tenant does a walkthrough to confirm it.
The inspection and the condition record are the steps people skip when they are in a hurry, and they are the exact steps that prevent a dispute later about whether a dent in the wall was there before the tenant arrived.
The renewal or vacate workflow
The third workflow handles the two ways a lease can end, and the two paths are different enough that the flow has to cover both.
It starts when the renewal notice goes out, usually weeks before the lease ends. The tenant then chooses to renew or to vacate. If they renew, the new lease is signed and the flow is short. If they vacate, a move-out date is scheduled, a move-out inspection documents the unit, the deposit is settled according to the findings, and finally the unit is turned over for the next tenant.
Deposit settlement is the step where mistakes cost real money and invite disputes. Deposit return deadlines and any documentation for deductions vary by jurisdiction and lease, so confirm the applicable requirements with qualified local advice. Then attach the verified deadline to the settle-deposit step so it is not treated as open-ended.
Treat the two paths separately inside the one diagram. The renewal path is a single step; the vacate path is the long one, and it is where the money and the timing risk live, so it needs the most attention.
How to create the workflow
Start by writing the steps as a simple list, in the order they actually happen, not the order the policy says they should happen. The workflow has to match what the office really does or no one will follow it.
Next, assign an owner to each step. A step with no owner is a step that waits. In a maintenance flow, the owner changes from tenant to manager to contractor and back; drawing that handoff is the whole point of the diagram.
Then connect the steps with arrows in the order they happen, and add the confirmation step that closes each loop. End every flow with a confirmation, not just a completion, because the two are different.
Finally, test the flow against a real, recent request or move-in. Walk a real example through the diagram and see where it stalls. The workflow is only as good as its match to reality.
Once the flow is drawn, keep it where the team actually looks, not in a document that gets filed away. Pin it where requests are triaged, or link it from the tool the office already uses. And revisit it after each busy season — the first turnover or first winter of maintenance will surface steps the diagram missed, and those belong back in the flow.
Common mistakes in property management workflows
The first mistake is leaving out the confirmation step. A request is not done when the work is done; it is done when the tenant says it is done.
The second mistake is combining move-in and move-out into a single flow. They look similar, but they have different documents, different deposit rules, and different owners. Merging them is how a move-out step gets applied to a move-in.
The third mistake is drawing the policy, not the practice. A workflow that describes the ideal office is a poster. A workflow that describes the real office, including the informal shortcuts, is a tool people will actually use.
The fourth mistake is skipping the owner on each step. Without a name attached to each node, the diagram shows the sequence but not who moves it forward, and it stalls at the first handoff.
The fifth mistake is drawing the workflow once and never updating it. Processes drift as software changes, staff changes, and the portfolio grows. A workflow that is not revisited becomes a diagram of the office as it used to be, not as it is.
Free property management workflow template
Open the property management workflow template to get all three flows already laid out: maintenance request, lease move-in, and a real renewal-or-vacate decision branch. Replace the example steps with your own, add owners and verified deadlines, and duplicate a scene for each property type or portfolio.
If your workflow spans several people and you need to show exactly who owns each step, start from the swimlane diagram template. For a simple sequence without owners, the process map template is the lighter option.
A documented workflow does not make the work disappear, but it makes every step visible, and a visible process is one your team can actually follow when the office gets busy.