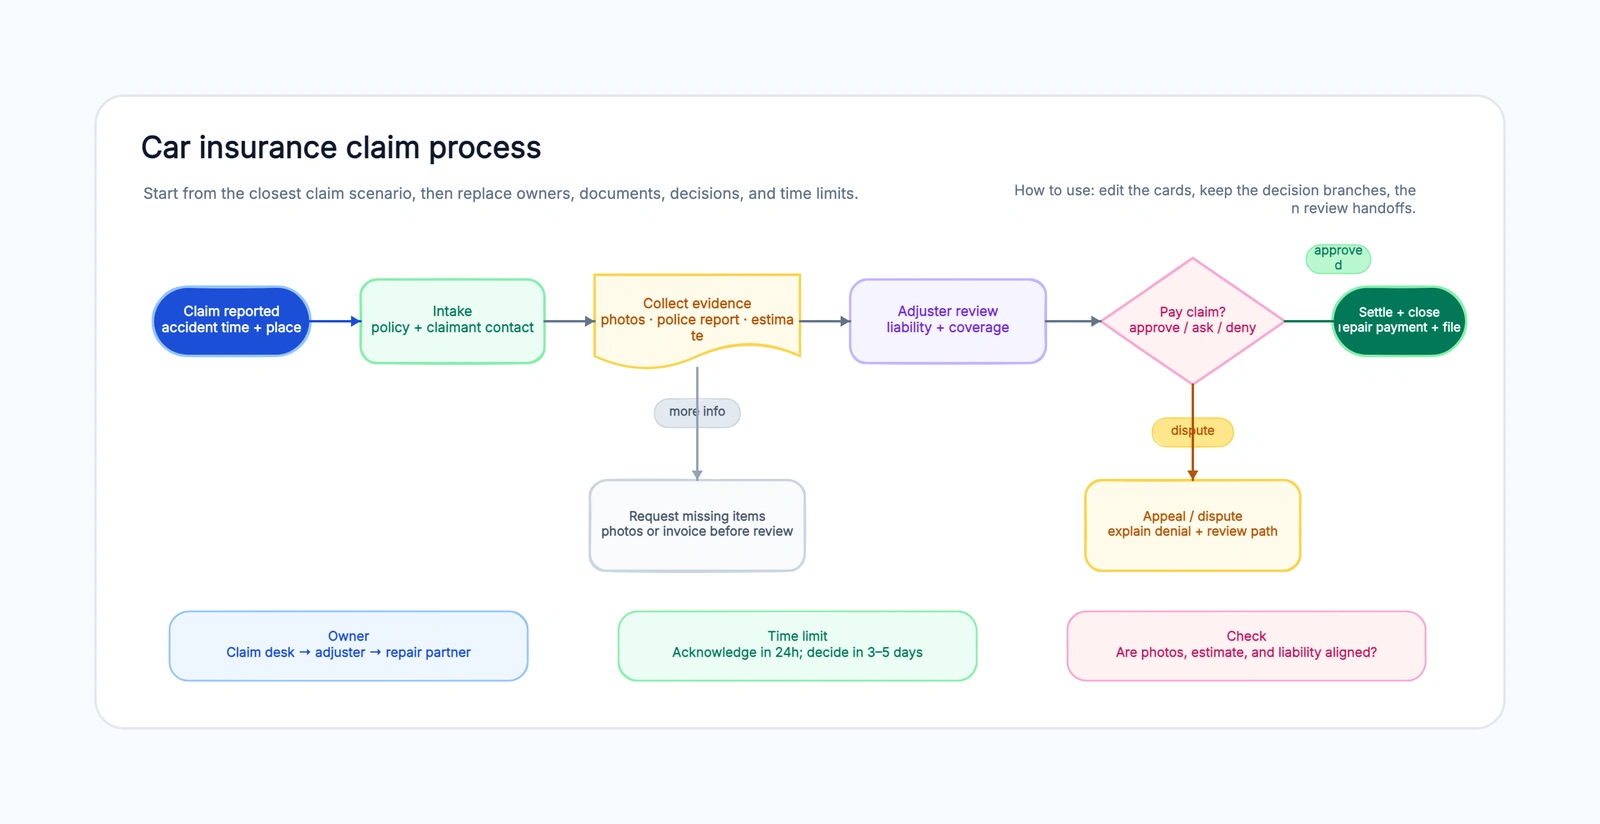
An insurance claim process flowchart is useful because claims are full of handoffs. A customer reports a loss. Someone verifies policy details. Someone collects documents. An adjuster or reviewer checks coverage. A decision is made. Payment may go out, information may be requested, or a denial may trigger an appeal.
When that process lives only in a long SOP, people often miss the path. A flowchart makes the path visible. It shows where a claim can wait, branch, loop back, or move to the next team.
This guide explains how to draw an insurance claim process flowchart for auto, health, or property claims. It is not legal or insurance advice. It is a practical way to map your workflow before you write procedures, train staff, or review bottlenecks.
Define the claim type first
Do not start with a generic “claim process” box. Start by naming the claim type.
Auto claims often involve accident details, photos, police reports, repair estimates, rental coordination, liability review, and body shops. Health claims may involve provider bills, eligibility, coding, medical necessity, preauthorization, denial codes, and appeal rules. Property claims may involve site inspection, damage inventory, repair estimates, photos, and proof of ownership.
The high-level process is similar, but the evidence and decisions differ. If the flowchart tries to cover every line of business at once, it becomes vague. Make one clean flow for the scenario you are explaining.
The insurance claim process flowchart template includes auto, health, and property scenes so you can start with the closest structure.
Map the happy path
Begin with the simplest successful path:
- claim reported;
- intake and verification;
- documents collected;
- review or adjustment;
- coverage decision;
- settlement or payment;
- closure.
This path gives the diagram a spine. Use short action labels. “Collect evidence” is better than a paragraph. Put details inside the node only when they help the reader understand what belongs there, such as “photos · receipts · forms.”
If the happy path is not clear, the exception paths will be impossible to understand.
Add documents and evidence
Claims often stall because the right information is missing. Make required evidence visible in the flowchart.
For auto claims, that might include photos, accident report, repair estimate, driver information, and rental documentation. For health claims, it might include provider bill, procedure codes, diagnosis codes, chart notes, preauthorization, or medical-necessity evidence. For property claims, it might include photos, inventory, receipts, inspection notes, contractor estimates, or proof of ownership.
You do not need a separate node for every document. Group them where the customer or provider actually submits them. The goal is not to create a checklist; the goal is to show where missing documents affect the path.
Show decision points clearly
Every claim process needs at least one decision point. Common branches include:
- approved;
- denied;
- pending more information;
- partially approved;
- referred to investigation;
- appeal or dispute.
Do not hide these inside a single “review claim” box. If a decision changes what happens next, it deserves its own decision node.
For a simple operational chart, you can use a rounded rectangle labeled “Coverage decision: approve / deny / ask more.” For a stricter flowchart, use a diamond and label branches. Either way, the reader should know what happens when the claim is not simply approved.
Separate customer work from internal work
One of the most useful improvements is separating what the customer does from what the company does.
Customer or provider actions might include reporting the loss, submitting forms, uploading photos, sending receipts, or filing an appeal. Internal actions might include intake, eligibility check, adjuster review, fraud review, coverage decision, payment approval, and closure.
You can separate them with swimlanes if the process is complex. For a simpler chart, use clear labels or color coding. The important thing is that a customer-facing support team can see what they are waiting for and what happens internally after the customer sends information.
Add the appeal or dispute path
Many claim process diagrams stop at payment or denial. That is too neat for real operations.
If a claim can be denied, partially paid, or pended for more information, show what happens next. The appeal path might include missing documents, medical records, repair dispute, second review, supervisor review, or formal appeal.
This branch matters for training. New staff need to know that “denied” is not always the end of the customer journey. Support teams need to know what proof is useful and where to send it.
Review for bottlenecks
After the chart is drawn, read it as a process-improvement tool. Ask:
- Where does the claim wait?
- Which step depends on a customer, provider, vendor, or adjuster?
- Are the same documents requested twice?
- Are customers sent backward without knowing why?
- Who owns the pending-more-information path?
- Is the appeal path visible enough for support staff?
A flowchart is not only documentation. It is a way to find avoidable friction. If three teams touch the same document but no one owns the missing-information message, the diagram will show it.
Common mistakes
The biggest mistake is drawing only the approved path. Real claims include missing documents, partial approvals, denials, disputes, and appeals. If those paths are not on the chart, the chart will fail precisely when staff need it most.
Another mistake is mixing policy logic with operational handoffs. A coverage rule may be complex, but the flowchart should still show who reviews it and what happens next.
Teams also overload nodes with text. Keep each node readable. If a step needs a full policy explanation, link it to an SOP or note instead of turning the diagram into a wall of text.
Finally, do not treat this as legal or compliance advice. Claims depend on policy language, jurisdiction, regulations, and carrier rules. The flowchart is a map of your process; the process still needs review by the right experts.
Free insurance claim process flowchart template
Open the insurance claim process flowchart template and choose auto, health, or property. Replace the example nodes with your real step names, add owners and time limits, and mark what happens when a claim is approved, denied, pended, or appealed.
For non-insurance workflows, start with the process map template. For internal sign-off and decision chains, use the approval flowchart template.
A good claim flowchart does not make the process magically simple. It makes the complexity visible enough that people can improve it.