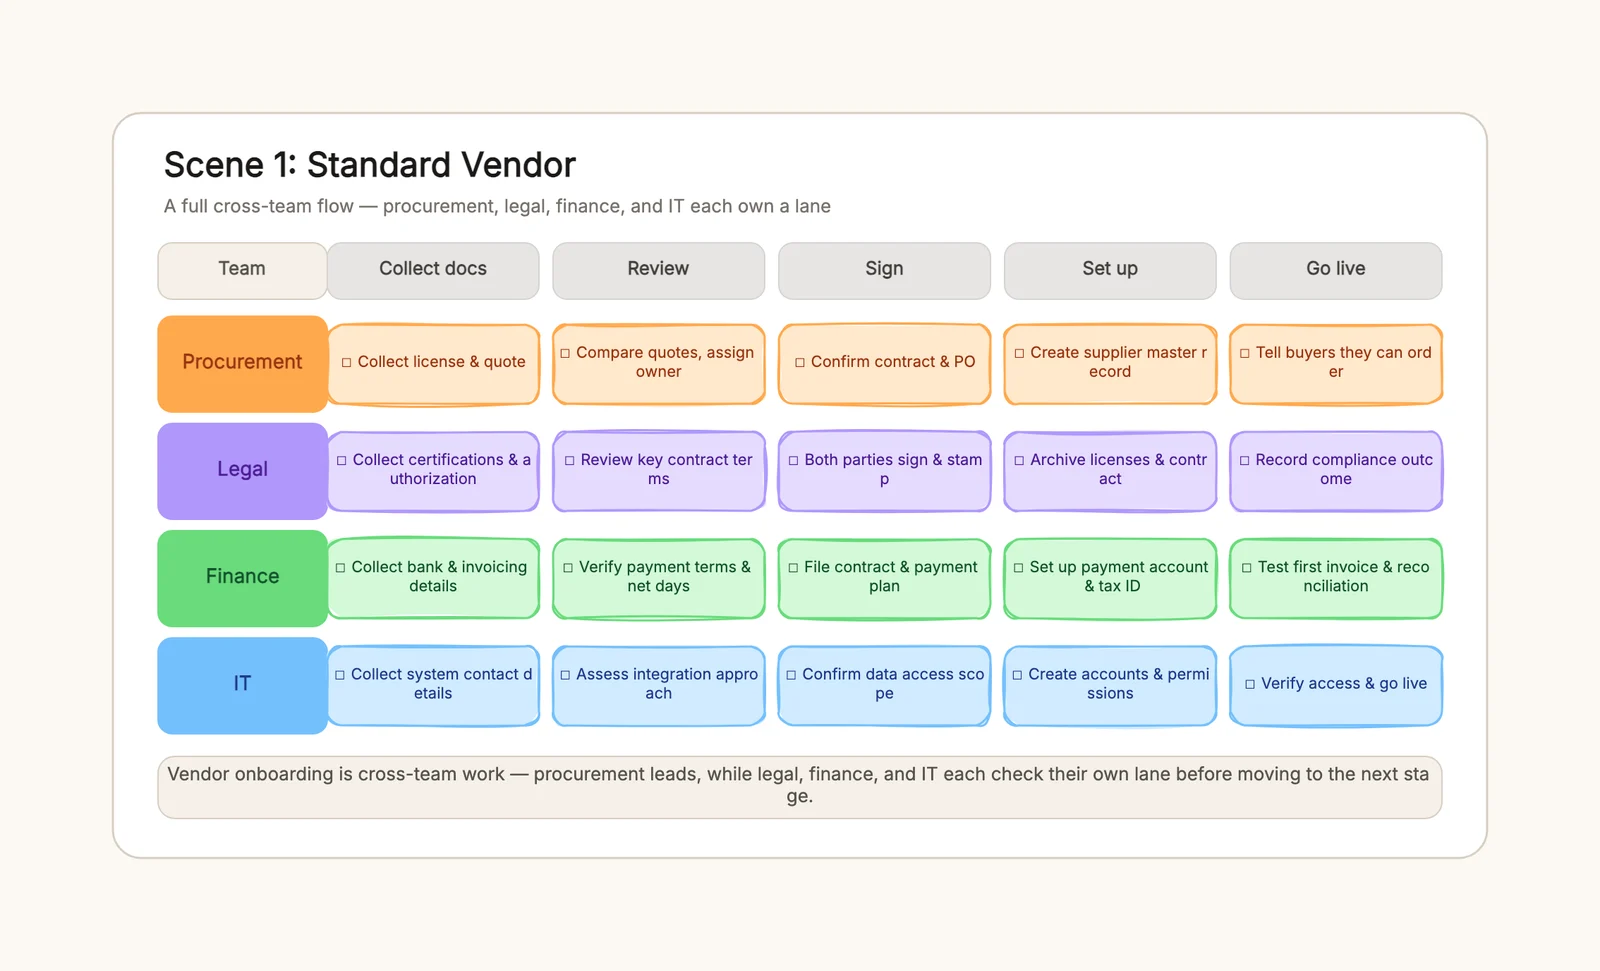
A vendor onboarding checklist is a cross-team grid that carries a new supplier from the first quote to the first invoice, with procurement, legal, finance, and IT each owning one swimlane. It answers the question that usually gets asked too late — "did anyone review the contract?" — before it can block a payment or a login.
This guide shows how to build the checklist in five steps, then walks through a standard, one-time, and SaaS onboarding so you can copy the structure and adapt it. You can open the vendor onboarding checklist template and edit the lanes, stages, and actions directly in the browser.
What a vendor onboarding checklist should achieve
A vendor onboarding checklist is not a to-do list for one person. It is a handoff map between four teams that rarely sit in the same room, and the value is that it makes each team's slice of the work visible to the other three.
A useful checklist produces five outcomes:
- every team can see its own cells and ignore the rest;
- nothing is paid, signed, or granted access before the stage that owns it is done;
- documents are collected once, in the first stage, not rediscovered at the last minute;
- the vendor goes live only when every lane has checked off its final cell;
- a one-time vendor never gets dragged through long-term onboarding steps it does not need.
Avoid treating every vendor as the same size. A standard supplier earns the full five-stage matrix, a one-time contractor skips set-up and go-live, and a SaaS tool shifts the whole flow toward security. Start from the same four swimlanes and branch only where the vendor genuinely differs.
How to build a vendor onboarding checklist
The most useful checklist is organized by responsibility first and time second. Four swimlanes run down the side, the stages run across the top, and every cell is one checkable action.
1. List your vendor types and pick a flow
Write the kinds of vendors you actually add — a materials supplier, a freelance contractor, a SaaS subscription, a marketing agency — and decide which get the full flow and which get the condensed one. The standard flow is five stages; the one-time flow is four. Deciding up front is what stops a simple purchase from becoming a six-week project.
2. Name the four swimlanes and their owners
The four swimlanes are procurement, legal, finance, and IT. Assign a real owner to each, not a department name — a person who can be asked "is your lane done?". If you are a small team, one person may hold two lanes, but the lanes stay separate because the handoff still matters.
3. Lay out the stages in order
Across the top, put the stages in the order they actually happen: collect documents, review and approve, sign, set up records, go live. The order is the rule — you collect before you review, you sign before you set up payment, and you go live only after access is tested.
4. Fill each cell with a checkable action
For each lane-by-stage cell, write one concrete action, not a topic. "Legal / review" is a topic; "Legal / review the DPA and data-processing terms" is an action a person can check off. Keep the verb specific so a cell is either done or not done — there is no "partly".
5. Add the go-live gate
The final column is not a formality. It is the gate where procurement confirms buyers can order, finance confirms the first invoice reconciled, legal records the compliance outcome, and IT confirms access is verified. Nothing is enabled until all four are checked.
The document list that starts everything
Stage one is where onboarding either stays fast or stalls. Collect everything up front and the review and sign stages run on complete information; miss a document and legal will be chasing a license the week before signing. Here is the document set that covers most vendors, split by lane:
- Procurement — business license or registration, a current quote, and the supplier's lead time and minimum order quantity.
- Legal — certifications or accreditations, a signed authorization letter, and any industry-specific compliance documents.
- Finance — bank account details, invoicing and tax details, and the vendor's payment terms.
- IT — the system contact and, for software, the SSO and API details.
Collect these once, in a shared place, so each lane pulls what it needs instead of asking the vendor twice. A vendor who has to resend the same document to three different people is a vendor who is already doubting your process.
Standard vendor walkthrough
Here is what a standard supplier onboarding looks like when the checklist is doing its job. Say you are adding a packaging supplier.
In the collect-documents stage, procurement pulls the business license and a quote, legal collects the certifications and authorization letter, finance collects bank and invoicing details, and IT collects the system contact. Four people work in parallel, but each knows only their column matters.
In review, procurement compares quotes and assigns an owner, legal reads the key contract terms, finance verifies payment terms and net days, and IT assesses how the supplier will integrate. This is where the parallel lanes prevent the classic failure — finance finding out about a contract clause only after payment is already set up.
In sign, procurement confirms the contract and purchase order, legal gets both parties to sign and stamp, finance files the contract and payment plan, and IT confirms the data access scope. Signing is a checkpoint, not an afterthought.
In set-up, procurement creates the supplier master record, legal archives the licenses and contract, finance sets up the payment account and tax ID, and IT creates accounts and permissions. Only now — after the contract exists — does money and access start to move.
In go-live, procurement tells buyers they can order, legal records the compliance outcome, finance tests the first invoice and reconciliation, and IT verifies access. The vendor is live when, and only when, all four lanes are checked.
One-time and SaaS vendors: where the flow changes
A one-time vendor — a freelancer, a one-off consultant, a single event caterer — does not need records or a long-term go-live. The flow collapses to four stages: collect, review, sign, and pay and close. Procurement logs the order, legal reviews and signs a one-time agreement, finance arranges a single payment, and IT either skips access or opens a temporary account it revokes afterward. The point of the condensed flow is speed without losing the legal and financial checkpoints.
A SaaS vendor keeps all five stages but the actions turn toward risk. Legal collects the DPA and security docs and signs the MSA and DPA. IT runs a security and pen-test review, confirms data residency and export, and configures SSO and roles. Finance sets up subscription billing and tests the first invoice. The rule that matters most here: no access and no payment until the security review is done. For more on cross-functional structures like this, the swimlane diagram template shows the same lane-by-role idea for any process.
Common vendor onboarding mistakes
Adding legal at the end
The most expensive mistake is treating contract review as a final checkbox after finance has already set up payment. Legal belongs in the flow from the collect-documents stage, so a clause that changes payment terms is caught before money moves.
Paying or granting access before signing
Bank accounts, auto-billing, and system logins should all wait until the contract is signed. Paying a vendor you have not committed to, or giving a SaaS tool access you cannot yet revoke, is a risk the checklist exists to prevent.
One flow for every vendor
Forcing a one-time contractor through records and go-live stages adds weeks and noise to a purchase that should close in days. The condensed flow is not a shortcut around the checkpoints — it is the right scope for a short relationship.
No go-live gate
Without a final all-lanes-checked gate, the vendor ends up half-enabled: buyers can raise orders but IT has not granted access, or access exists but finance has not tested the invoice. The gate is what makes "onboarded" mean something.
Collecting documents twice
When documents are collected reactively — when legal asks for a license the week before signing — the flow stalls. Collecting everything in the first stage means the review and sign stages run on complete information.
Keep the checklist current
Review the checklist after each vendor and note where it stalled, then fold that back into the template so the next onboarding starts cleaner. Keep a short version — the four swimlanes and the go-live gate — pinned for quick reference, and reuse the full matrix whenever a new supplier type shows up.
Start with the vendor onboarding checklist template, replace the lanes and actions with your own teams and vendors, and hold the go-live gate. If you are instead activating customers rather than suppliers, the onboarding flowchart template runs the mirror-image flow, and the employee offboarding template closes people and access out with the same lane-by-role discipline.