A wireframe is a low-fidelity visual representation of a screen, page, or interface. It shows the layout, structure, and content hierarchy of a design without color, imagery, or visual styling. Wireframes look like blueprints — labeled boxes and placeholders rather than a finished interface.
The purpose of a wireframe is to establish where things go before anyone invests time in how they look. This separation of concerns is the core value: structure decisions and visual decisions are different decisions, and they're best made at different times by sometimes different people.
Getting the structure right first is dramatically cheaper than discovering structural problems after polished visual design has been created. A wireframe change takes minutes. Redesigning a pixel-perfect mockup to fix a layout problem takes hours.
What a Wireframe Contains
Boxes and rectangles. Images are shown as rectangles, sometimes with an X through them or a camera icon. Video is a rectangle with a play button. The actual content doesn't matter at this stage — the space it occupies does.
Real text (sometimes). Headlines, button labels, and navigation items are often written as actual text rather than dummy content ("Lorem ipsum"). This matters because text length affects layout — a 10-word headline and a 30-word headline occupy very different amounts of space.
Layout structure. The wireframe shows how the page is organized: where the navigation sits, how sections are stacked or divided, how content blocks relate to each other.
Interactive hints. Simple annotations or arrows can indicate what happens on click, hover, or form submission. These are usually brief notes rather than detailed specifications — detailed interactions are documented in separate spec documents or prototypes.
Annotations. Notes alongside the wireframe that explain behavior, edge cases, conditional logic, or questions that need resolution.
What wireframes deliberately exclude: color palettes, typography choices, imagery, brand elements, and high-fidelity visual polish. Including any of these too early shifts the conversation from "does this structure work?" to "do we like this aesthetic?" — which is the wrong conversation to be having during wireframing.
Wireframe Fidelity Levels
Not all wireframes are equally rough. The appropriate level of detail depends on where you are in the design process and what decisions need to be made.
Sketch wireframes (lowest fidelity). Hand-drawn or very rough digital sketches. Used in early exploration when you're testing structural ideas quickly and don't want to commit to anything. The goal is to generate and discard options fast.
Greyscale wireframes (medium fidelity). Digital wireframes using boxes, placeholders, and real labels but no color or visual styling. The most common type. Used for stakeholder reviews, developer handoff, and usability testing.
Annotated wireframes (medium-high fidelity). Greyscale wireframes with detailed annotations explaining behavior, states, and edge cases. Used as developer handoff documentation.
High-fidelity wireframes. Wireframes that include final content and accurate proportions but still lack visual styling. Used when content decisions and layout need to be finalized before visual design begins.
The appropriate level isn't always the most detailed one. Early in a project, rough sketches move faster and are easier to discard. High-fidelity wireframes make sense only when the structure is stable and you need to nail down the details before visual design.
Wireframe vs. Mockup vs. Prototype
These three terms are frequently confused. They represent distinct stages in the design process:
| Wireframe | Mockup | Prototype | |
|---|---|---|---|
| Visual fidelity | Low | High | High |
| Color and style | No | Yes | Yes |
| Interactivity | No | No | Yes |
| Content accuracy | Approximate | Final or near-final | Final or near-final |
| Primary purpose | Structure | Appearance | User testing |
| When to use | Early | Middle | Late |
| Time to create | Fast | Medium | Slow |
Wireframe: Answers "what goes where and how is it organized?" Can be changed with minimal effort.
Mockup: Answers "what will this look like?" Shows the visual design applied to the structure. Changes become more expensive because visual styling is baked in.
Prototype: Answers "does this work the way users expect?" A clickable, interactive simulation. The most expensive to create and the closest to the real product.
The key relationship: you build a mockup on top of an agreed wireframe. You build a prototype on top of an agreed mockup. Skipping wireframes and going straight to mockups isn't always wrong — for small, well-understood changes, it's often the right call — but for any significant new feature or page, skipping wireframes almost always means discovering structural problems at mockup stage, which is more expensive.
Real-World Wireframe Examples
E-Commerce Product Page
A wireframe for a product page might show:
- Header: logo, search bar, cart icon, account link
- Breadcrumb navigation
- Product image (large box, left side)
- Product title, price, rating (right side)
- Add to cart button (prominent, right side)
- Product description tabs (Description / Reviews / Shipping)
- Related products grid (below the main content)
The wireframe doesn't show which product, what the colors are, or what the image looks like. It shows that the image is on the left, that the purchase action is immediately visible alongside the product information, and that secondary content (reviews, shipping) is accessible but not dominant.
Mobile App Onboarding
A wireframe for an onboarding flow:
Screen 1: Welcome message (centered text), large illustration placeholder, "Get Started" button (prominent), "Log In" link (secondary)
Screen 2: Permission request — microphone icon, explanation text, "Allow" button, "Not Now" link
Screen 3: Profile setup — name field, optional photo upload placeholder, "Continue" button
Screen 4: Tutorial step 1 of 3 — interactive element placeholder, explanation text, "Next" button, progress indicator
The wireframe defines how many screens the onboarding has, what appears on each screen, and the hierarchy of actions. None of this requires deciding on brand colors or typography.
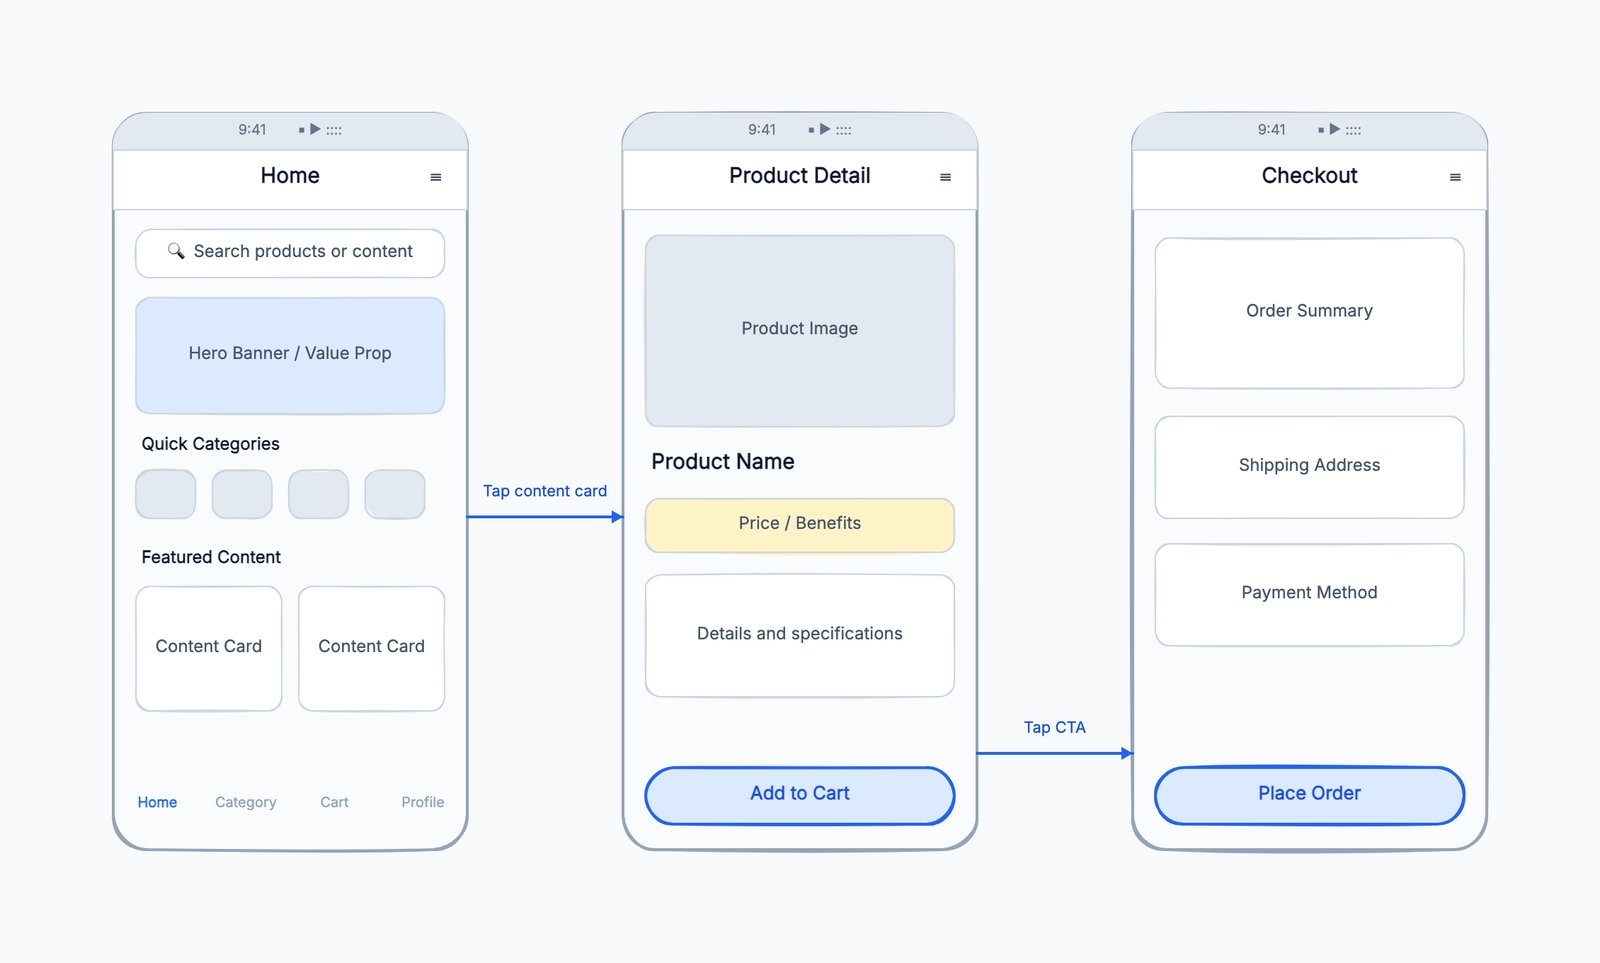
For multi-screen flows like this, start with the wireframe template. It now includes a connected Home → Detail → Checkout structure, which makes it easier to discuss screen transitions instead of treating each page as an isolated box.
Dashboard Design
A wireframe for an analytics dashboard:
- Left navigation sidebar with icons and labels
- Top bar: search, notification bell, user avatar
- Main content area divided into:
- Summary cards row (4 metrics)
- Primary chart (largest element, 60% width)
- Secondary chart (40% width, beside primary)
- Table below charts (full width)
- Right panel (collapsible): filter controls
The wireframe makes clear that filters are on the right and secondary, that the primary chart gets the most visual weight, and that summary numbers appear above everything. These are structural decisions that affect how users experience the dashboard — and they should be made before any visual work begins.
The Wireframing Process
Step 1: Understand the goal. What is the user trying to accomplish on this screen? What information do they need? What action should they take? Write the answers down before drawing anything.
Step 2: List the content elements. What must appear on this page? Write out every element — headline, body text, image, button, form field, navigation. Don't start drawing until you have a complete list.
Step 3: Prioritize. Not all elements are equally important. Which element is most critical to the user's goal? Which is secondary? This priority hierarchy should be reflected in size, position, and visual prominence in the wireframe.
Step 4: Sketch rough layouts. Try multiple arrangements on paper or in a rough digital sketch before committing. The goal is to explore options, not to get the first one right.
Step 5: Refine digitally. Take the best rough layout and build it properly in a wireframing tool. Replace sketched elements with proper boxes and labels. Add enough detail that someone unfamiliar with the project can understand the intended structure.
Step 6: Annotate. Add notes explaining behavior that isn't obvious from the layout: what happens when the form fails validation, how does this element behave on mobile, what text appears in this state.
Step 7: Review and revise. Share with the team. The goal of a wireframe review is structural feedback — is the hierarchy right, is anything missing, is the flow logical? Not "I think the button should be blue."
When Wireframes Are Most Valuable
New features or pages. Anything that doesn't already exist in a defined form benefits from wireframing before visual design begins.
Restructuring existing pages. When you're reconsidering how a page is organized, wireframing the new structure before redesigning prevents locking in structural decisions too early.
Complex interactions. Multi-step flows, forms, and data-dense interfaces benefit from wireframing because the structural decisions are complex enough to warrant careful consideration before visual polish.
Cross-team alignment. When designers, developers, and product managers need to agree on what's being built before work begins, a wireframe is the shared reference.
When to Skip Wireframes
Simple, well-understood changes. Moving a button, changing a label, adding a field to an existing form doesn't usually need a wireframe — the structure is already decided.
Rapid iteration. When speed is more important than documentation, moving directly to mockups or prototypes is reasonable.
Strong existing design system. If the design system defines how every element is built and a new feature is just combining existing patterns, wireframes add little value.
Frequently Asked Questions
What's the best wireframing tool? For designers who will move from wireframe to high-fidelity design: Figma (the industry standard, free for individuals). For low-fidelity sketching: Balsamiq, Wireframe.cc, or CodePic. For anything embedded in Google Docs: Google Drawings.
Should wireframes be clickable? Only if you're doing usability testing with them. Clickable wireframes blur the line between wireframe and prototype. Keep wireframes static until you're ready to create a prototype.
Who should create wireframes? Typically designers or product managers. The person creating the wireframe should understand user needs, technical constraints, and business requirements — not just what looks nice.
How long should wireframing take? A simple page wireframe: a few hours. A complex flow with multiple screens: a few days. If wireframing is taking weeks, something is wrong — either the scope is too large or too many decisions are being deferred to the wireframe stage that should have been decided earlier.
Looking for a tool to get started? Check out our guide to the best free wireframe tools, or jump straight into our wireframe template to start sketching immediately.