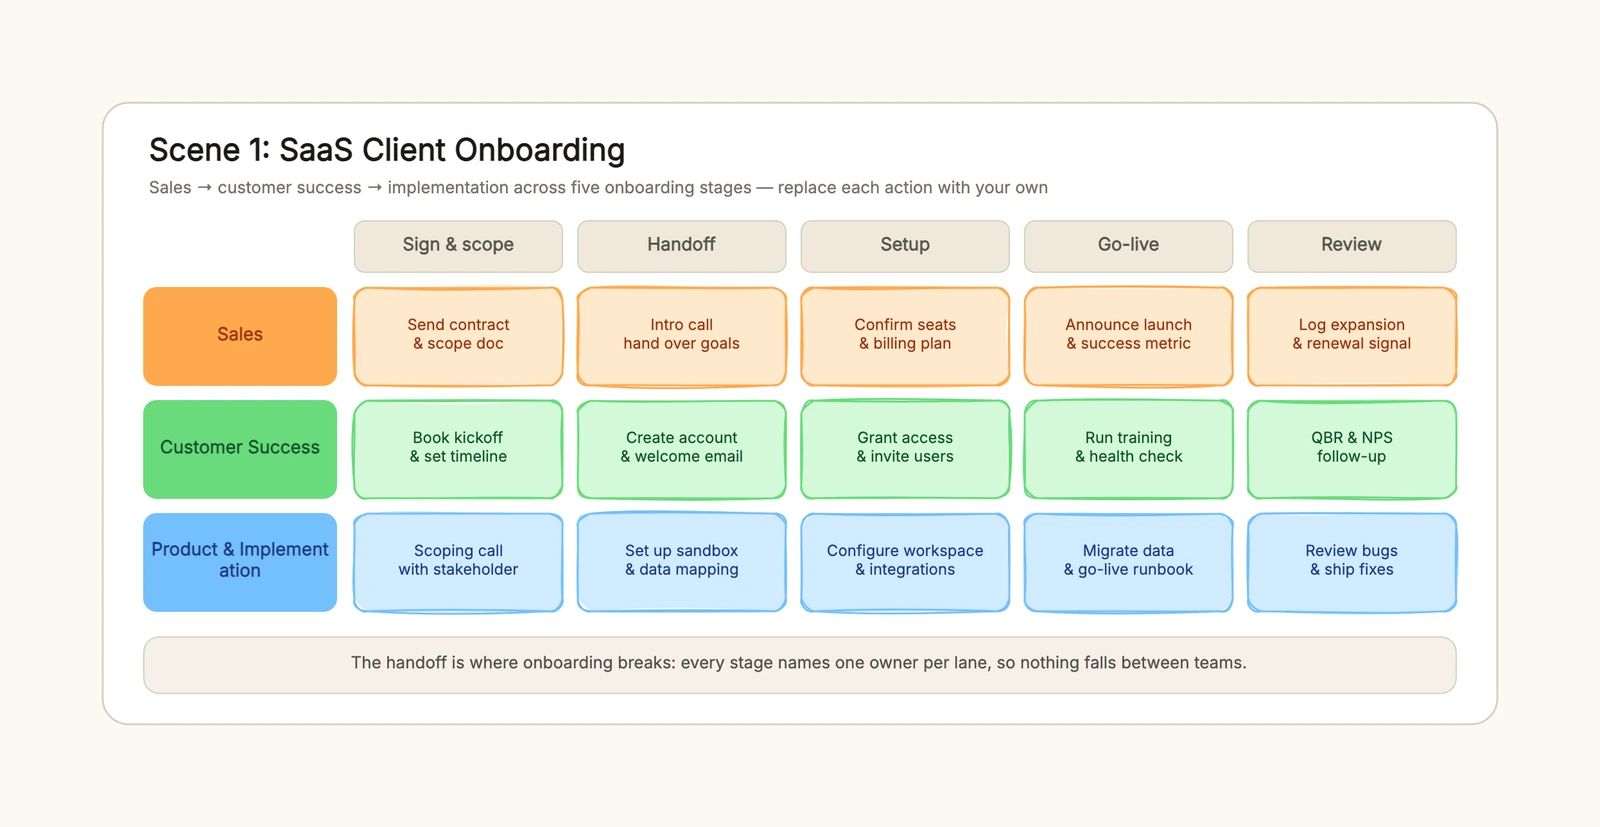
A client onboarding checklist is what stops a signed contract from turning into a silent two-week wait. The sale closes, the customer is excited, and then three teams — sales, service, and product — each assume someone else is handling the next step. Accounts don't get created, access doesn't get granted, and the customer's first week, which should have felt like momentum, feels like being ignored.
This guide shows how to build a client onboarding checklist as a three-lane handoff across five stages, then walks through the shape it takes for a SaaS product, an accounting firm, and a managed services provider. You can adapt the client onboarding checklist template and rename the lanes and actions directly in the browser.
What a client onboarding checklist should achieve
A client onboarding checklist is not a task list. It is a handoff plan organized around who owns each stage, not just what needs to be done. A workable checklist should answer four questions: which teams are involved, what order the stages run in, who owns the handoff between stages, and what the customer receives at the end of each one.
A useful checklist should produce five outcomes:
- every handoff has a single owner and a date, so no step waits on "not my team";
- the customer receives a welcome message with next steps and one contact within the first day;
- access and accounts are set up before the customer has to ask for them;
- go-live is defined in writing — first login, first close, or first cutover — with someone confirming it;
- the review stage catches issues and logs renewal signals instead of closing the loop at launch.
A checklist and a standard operating procedure solve different problems. The checklist fixes who does what and in what order; the SOP holds the click-by-click steps for one handoff. Keep the checklist at the level of "create account" and put the detailed instructions in the SOP, or the checklist bloats into a document nobody finishes.
Don't treat every onboarding as the same shape. A SaaS customer needs a technical setup lane. An accounting client needs a document and access lane before the first close. An MSP client needs a cutover and monitoring lane. The five-stage skeleton stays the same; the lanes and their actions change with the industry.
How to build a client onboarding checklist
The most useful checklist is organized by lane and stage, not by a flat list of to-dos. When every cell belongs to one team at one stage, ownership stops being a question and becomes a grid you can point at.
1. Name the teams and give each a lane
Write down the teams that touch the customer before launch. For most companies that is sales, service, and product — or their equivalents. Give each one a horizontal lane and one color, so ownership reads at a glance on the canvas.
2. List the stages in order
The five stages — sign & scope, handoff, setup, go-live, and review — work for most onboarding because they catch the points where work changes hands. Adjust them if your real process has a compliance gate or a data migration phase that deserves its own column.
3. Fill one action per cell
Each cell holds a single action that team owns at that stage. Keep it to an action plus a short detail — "create account / & welcome email" rather than a paragraph. The point is a checklist, not a project plan.
4. Mark the handoff stages
The handoff column is where customers stall, so give it extra weight. Write who passes the baton and who confirms receipt. If the account manager sends the intro and the implementation lead confirms the scoping call, both halves are named.
5. Define go-live
Write down what "live" means for this customer — first login, first report, first close, first cutover — and who confirms it. Without this, onboarding never officially ends and the team drifts into support without a handoff.
6. Close the loop with a review
A review stage turns onboarding into a loop. It catches what broke, logs renewal signals, and feeds the next onboarding. One check-in call after go-live is worth more than a perfect plan on paper.
The reason this works better on a canvas than in a spreadsheet is that a swimlane grid shows the whole handoff at once. In a spreadsheet, each team sees its own tab and the handoffs stay invisible. On one canvas, the three lanes sit side by side, so the account manager can see that the implementation team still owns data migration and stop asking whether it happened.
SaaS onboarding example
A SaaS onboarding usually has three lanes: sales, customer success, and product. Sales owns the contract and the scope, customer success owns the relationship and the training, and product owns the environment and the data.
The sales lane runs send contract and scope doc, then a handoff call that passes goals to customer success, then confirming seats and the billing plan. Customer success books the kickoff, creates the account, sends the welcome email, grants access, invites users, and runs training. Product runs the scoping call, sets up the sandbox, configures the workspace and integrations, migrates data, and runs the go-live runbook.
The SaaS mistake that costs the most is a handoff with no owner. When the contract closes and the account manager assumes the implementation team will reach out, the customer waits. Name the handoff and the customer never has to ask who is handling their account.
Accounting firm onboarding: what changes
An accounting firm onboarding shifts the lanes to partner, account manager, and the bookkeeping and tax team, and the go-live moment becomes the first close. The partner owns the engagement letter and fee agreement, hands the client to the account manager, and confirms the service scope and filing dates.
The account manager runs the kickoff, collects documents, sets up the client, sends the welcome email, and requests access to the books and bank feeds. The bookkeeping team scopes the work, reviews the prior year, maps the chart of accounts, imports and reconciles the ledger, and delivers the first close with draft statements.
This is a structure for the handoff, not tax advice. Filing deadlines, tax positions, and compliance decisions come from a licensed professional — the checklist just makes sure the right team has the right access at the right time. For the workflow that continues after onboarding, the customer success workflow template covers the ongoing account journey.
MSP onboarding: what changes again
An MSP onboarding is a handoff of access and runbooks as much as a sale. The lanes become sales, service desk, and onboarding engineers, and the go-live moment becomes the cutover.
Sales owns the service agreement and SLA terms, then a handoff call that passes the asset list to the engineers. The service desk opens the ticket portal, creates accounts, sends the welcome pack, and grants remote access and tools. The engineers run discovery and inventory, map the network and credentials, deploy agents and backups, and execute the cutover with monitoring set up.
The MSP mistake that costs the most is credentials scattered across inboxes and spreadsheets. Keep them in a vault and document every cutover step in a runbook, so the next engineer can repeat it without asking. When a checklist isn't enough and you need the full process drawn, the swimlane diagram template gives you the same lanes with a flow on top.
Common client onboarding mistakes
No owner on the handoff
The moment between the sale closing and the customer's first login is where accounts stall. Give every handoff a single owner and a date, or it becomes a game of "not my team."
Skipping the welcome email
Customers who get a welcome email with next steps and one contact feel guided from day one. Without it, they wait in silence and open a support ticket instead.
Treating onboarding as one lane
When one person carries sales, setup, and training, the list looks short but hides the handoffs. Split the work into lanes so each team sees its part and its owner.
No go-live definition
If no one writes down what "live" means, the onboarding never officially ends. Define the go-live moment and who confirms it, so the team knows when the handoff to support is done.
Forgetting the review stage
Onboarding that ends at go-live misses the chance to catch issues and log renewal signals. Add a review stage so the handoff becomes a loop instead of a one-way door.
Keep the checklist useful over time
After each onboarding, note what got stuck and update the cells, so the next customer starts from a better list. Keep a short version — the lanes, the go-live definition, and the handoff owners — in your notes, and reuse the full five-stage matrix when the next client signs.
Start with the client onboarding checklist template, rename the lanes and actions for your team, and walk one real customer through it before the next one. For the account journey that continues after go-live, see the customer success workflow template, and for the process-level view with connectors, the swimlane diagram template.